|
Nav N Go iGO Amigo Review |
28th May 2009 |
|
Review by Matthew Morley (MaFt)
Shortcuts: Introduction | Main Menu & User Interface| Choosing a Destination | Navigation
Speed Cameras & POIs | Extras | Round Up | Conclusion | Links
Introduction
 iGO Amigo is Nav N Go's latest output into the world of navigation software. It differs remarkably from iGO MyWay in both looks and features as well as its use as an OEM product. Previous versions of Nav N Go's software (iGO 2006 & iGO 8) were incredibly versatile and often tricky to master the entire set of options available, and that's even before bringing skins into play! They also appeared on a plethora of devices (both legally and illegally) and just from the sheer number of devices running their software it was practically impossible for consumers to be able to keep track of who was and who wasn't officially licensed! This is where Nav N Go plan to change things with Amigo.
iGO Amigo is only being licensed to a small number of companies in each region / country so any pirated versions should be easy to spot. They are also keen on online registration using a unique reference physically printed onto each device (a la Windows OEM Stickers). This process has, however, been well thought out – if you do not register the device you can still use it for navigation. It is the 'extra' features that are disabled without registration; the photo viewer, map updates, new colour schemes, games etc. On the settings screen there is also a 'Is it Legal?' button that shows you how you can check (look for a sticker and enter it online!).
It is worth noting that there are currently no official UK devices running iGO Amigo so the review is based on an Hungarian Navon N470 that has been Anglicised especially for me! As such, I will not review the hardware and mount etc but merely how well iGO Amigo, as a navigation software, performs.
So, Hungarian-English sat-navs and piracy issues out of the way, how does iGO Amigo fair next to the competition? 'Alright' is the answer, but that would make a poor review, so let me expand...
Main Menu & User Interface
 First up, Amigo is a whole new piece of software and not a cut-down and re-skinned iGO 8. The whole user-interface (UI) has been reworked and is actually very friendly as well as pleasing to the eye. The menus are nice and clear with a predominantly 'white and bright colours' look to them. After the initial set up (language, country, voice etc) you are presented with a screen with 4 options/areas. The predominant 'button' shows a scaled down version of the map view (which does actually update while you are driving) which takes you to the map screen. The other options are: 'Destination', 'My Route' (greyed out until you have a route set) and 'More...'. Menu transitions involve flips, slides fades and pop ups which, while I agree they are eye-candy, it does actually make it easier to follow what you pressed. Pressing 'Destination' makes the screen move down as though your view is moving 'up' to the Destination screen; likewise 'My Route' shifts the view to the right and 'More...' sifts it down. Pressing the map button makes the map expand to fill the whole screen. It's difficult to describe, but it looks good! Another addition to the UI is the slide/push gesture to quickly scroll through long lists (such as city names or countries). Any iPhone users should note that it IS only slide/push and not 'flick' – you have to keep your finger on the screen to scroll down the list!
Choosing a Destination
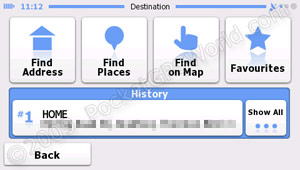 Choosing a destination is pretty standard – you can choose from an address, a 'place' (POI), browse the map, choose from one of your saved favourites or view a history of selected destinations.
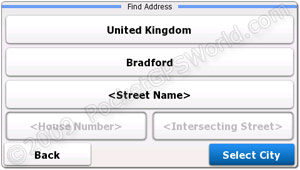
Find Address: The main input fields are Country, Town/Postcode and Street Name and pressing on any of these brings up an ABC keyboard. Unfortunately there's no option of a QWERTY keyboard but typing in a few letters is usually enough to find what you want by using 'List'. This version only has 5 digit postcodes but when it does make it onto a UK device the full 7-digit postcode option will be made available for manufacturers to use if they want it. At this point you can either navigate directly to the city centre ('Select City') or choose a street. After locating your street you have the choice of choosing a house number or an intersecting street. When choosing a house number you are shown the available numbers for example '<Enter House Number (2-36)>'. For the intersecting street you can either type the street or view a list of roads that join the selected road.
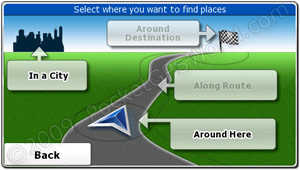
Find Places first brings up a screen with non-customisable presets of Petrol Stations, Restaurant, Parking and Accommodation with an option of 'Other Places' to pull up the full list of categories. Considering the rest of the input screens are very text based it seems strange that the 'find places' screen starts off with a graphical representation of a road and a city. On it you have the options of In a City, Around Destination, Along Route and Around Here. The destination and route related ones are greyed out when no route is set. Selecting any of these takes you to the search screen with options to Find by Name or Find by Category. These are self-explanatory and once you select a POI you are given more information such as address and phone number. You can't call directly from the software on this device but I would assume that a device with Bluetooth handsfree capabilities would allow this – however, this is only an assumption and you should check with the specific manufacturer before purchase!
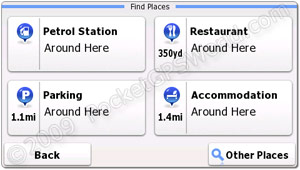

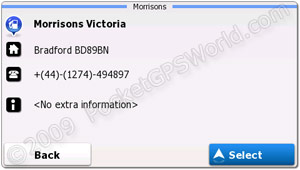
The POIs, sorry, 'places' are standard TeleAtlas ones for the UK and as such aren't very good. My nearest doctor is 100 miles away in Coventry closely followed by a few in Dublin, over 178 miles away! Although on the flip-side petrol stations seem to be well covered and fairly up to date. However, as the actual POIs are from a 3rd party, the main part is that searching them is easy with options to view all POIs, entire categories (e.g. all Medical), or entire subcategories (e.g. all Doctor). You will also be able to get more POIs via the naviextras.com website.
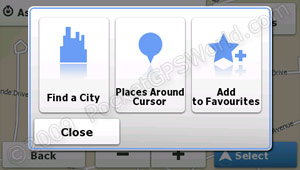
 The option to 'Find on Map' can be quite frustrating as one simple feature is missing: 'current location'. The only way you can centre the map back to where you are is to zoom out until you see your vehicle cursor then move the map and zoom in on yourself. Once you have clicked your chosen destination you simply press 'Select' to start routing. You also have 'More Options' which allows you to find a city, find 'places' (POIs) around the current cursor position or add the current cursor position as a favourite.
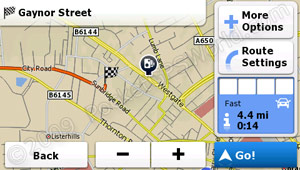
Once your destination has been chosen the route is then calculated according to your options. In the settings you can choose routing options for the vehicle type (car, pedestrian, bicycle, emergency, bus or taxi), planning method (fast, short, economical or easy) and road types (motorways, 'period charge', per-use toll, ferries and unpaved roads). The route is calculated quickly and you are shown a break down screen before starting navigation. The screen shows the destination on a map (with zoom options), More Options, Route Settings, the current selected route info (fast/short etc, total distance, total time and roads used (eg motorway, toll etc)). Pressing 'More Options' allows you to choose alternative routes (with all the times and distances displayed on the same screen for easy comparison), search for places around the destination or set the destination as a favourite. 'Route Settings' is simply a short cut to edit the route settings mentioned above. The route breakdown, while it shows you that you will be travelling on motorways and toll roads etc isn't that useful. I would have expected that if you press that part of the screen that it would give a breakdown of, for example, 160 miles on motorway, 30 miles on toll roads etc; but it doesn't. It's not the end of the world though; but it would be a nice additional feature.
Navigation
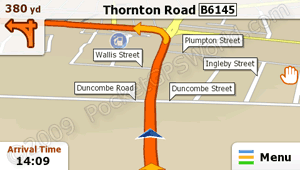
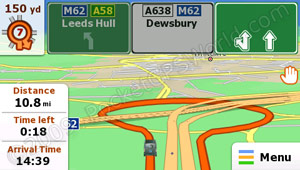
The navigation screen is well laid out showing enough information without covering up too much of the actual map. The screen shot below shows a breakdown of the layout (along with inset images for the parts that differ when not navigating).
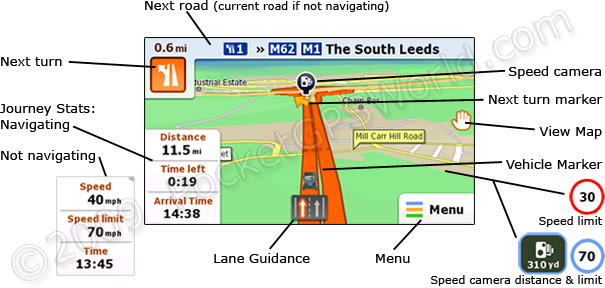
The bottom left part of the screen is slightly customisable. When navigating you can either show all of distance remaining, time left and arrival time or you can press one and the others are hidden thus freeing up a bit of map space. When you are not navigating the options are current speed, speed limit and time. Note that when navigating there is no option to show the current speed on the screen. If you go over the speed limit the speed limit sign (in red circle) is displayed on the screen along with a spoken warning of 'you are over the speed limit'. Pressing the hand on the right takes you to a 'browse map' function that allows you to adjust the angle of elevation as well; I'm not quite sure on the usefulness of this function though...

 Pressing 'Menu' brings up settings for View (2D, 3D or 3D+), Zoom (close, normal or far), Colours (day, night, auto), Favourites, 'Where am I?' and Volume. 'Where am I?' shows your position, altitude, road and nearest house numbers as well as a 'Help Nearby' option. 'Help Nearby' shows your nearest car repair, police, health and ATM and allows you to navigate directly to them or pull up address and phone details. As they use the same POI data as the 'places' they are somewhat limited – there are, apparently, no police in Bradford!
 The maps make use of elevation data but the limited zoom options and the lack of adjustable angle mean that you rarely get to see this effect. It is more noticeable when you are not navigating as the default view is slightly further away. Road elevations are also used in the map data as well as 3D buildings which, like in iGO 8, fade out as you get closer to them; however, there is no option to turn them off.
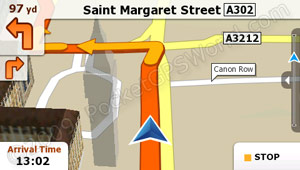
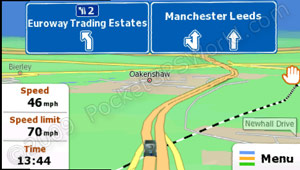
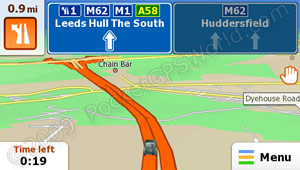
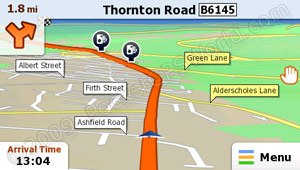
 As you approach a junction / turn the view automatically zooms in and pans to an almost over-head view – this makes navigation at more complex junctions far easier as you can clearly see the road layout. The graphic at the top left that shows your next turn is quite detailed and helpful too. iGO Amigo also features lane guidance in the form of arrows at the bottom of the screen showing which lane(s) to be in and it also features the best use (that I've seen at least) of motorway and road signs. The images below should highlight this.
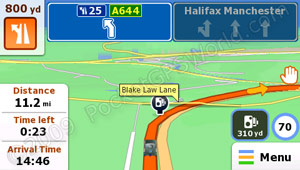
Warning distances are good with various reminders at 1 mile (eg on a motorway), 750 yards and 200 yards.
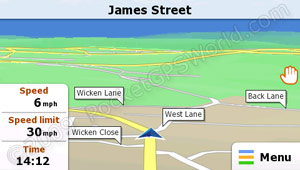
Speed Camera / POI Warnings
 First the good news: speed camera alerts in iGO Amigo are directional – i.e. you only get alerted to cameras that are relative to the direction you are going (but you always see an icon on the map regardless of direction). The bad news is that Nav N Go, for some reason, only have one icon regardless of camera type. iGO 2006 and 8 both had different icons per camera type (mobile, static, redlight, redspeed) where as every camera, regardless of type, is displayed as a standard speed camera icon. The image to the right shows MOBILE:11464@30 and GATSO:11444@30 in the distance. Installation of speed cameras is the same as iGO (see installation guide here) but replace the 'IGO' folder with the 'AMIGO' folder!.
You can also add your own POI files which are searchable along with the normal, in-built POIs. Simply create kml files (there are various sites and software that will convert ov2 files to kml format) and copy them to the memory card at amigo\content\userdata\poi (you may need to create these sub folders) and then restart the software. You cannot use any custom icons though.
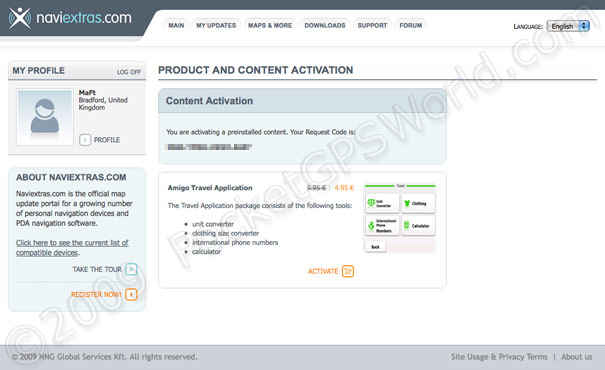
Extras
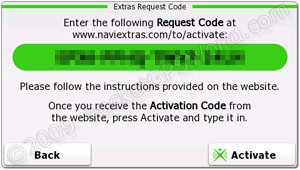
Amigo comes with a handful of extras to the actual navigation software. These include a jpeg/photo viewer, travel pack (currency convertor, size convertor etc.) and games. The photo viewer is free but needs activating via the naviextras.com website. The travel pack costs just under €5 and the games just under €10 each and are activated by entering a unique code at naviextras.com and then entering an activation code into the device.

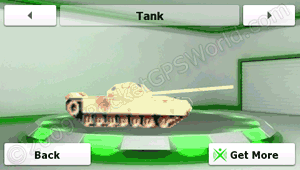 There are various pointers you can use if a blue arrow doesn't tickle your fancy and these range from cars, bikes and trucks through to people and flying carpets.
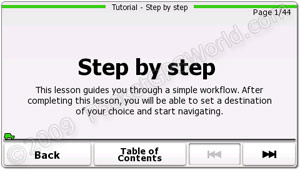
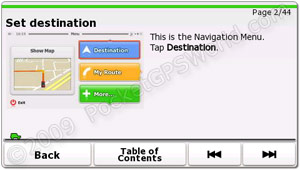
A useful addition are the guides; these provide step-by-step instructions on using the main features of Amigo (such as choosing a destination, saving a favourite etc). Although the software is fairly easy to use it's good that Nav N Go have catered for the more technologically inept among us.
Round Up
Pros
- Clear instructions
- Clear map screen
- Autozoom / overhead view at junctions is good
- Looks nice
- Simple to use
- Directional speed cmaera alerts
- Custom POIs (kml files)
Cons
- Find Places defaults are not user-definable
- No 'jump to current location' button in the 'browse map' screen
- Single speed camera icon regardless of type
- No adjustable distance for speed camera warnings
- Included POIs lack accuracy (TeleAtlas)
- Most of the extras require paying for
Conclusion
Amigo is a refreshing navigation solution that budget OEM makers would be wise to use. While some of it's features are limited this actually works well as the whole point of Amigo is as an easy to use navigation program. Some of the cons mentioned above would only really affect more advanced users but then more advanced users would prefer iGO 8 devices anyway! You should look at it as the same level as a TomTom One or Garmin nuvi 200 - if you want more advanced features you look to iGO 8, a TomTom x40 or a Garmin nuvi 8xx. The user interface looks good and it's actually a pleasure to use without it being to overbearing with it's fancy menu transitions. Navigation is sound and the directions are clear and easy to follow; the auto-zoom at junctions, lane guidance and road signs are also plus points for iGO Amigo.
References & Links:
| Comments
|
 Posted by Stand-Offish on Tue Sep 01, 2009 11:00 am Posted by Stand-Offish on Tue Sep 01, 2009 11:00 am |
 |
As per the review there is only one speed camera icon on Amigo.
I am used to different icons and speed zoned voices on a PDA I had (running windows mobile 5.0).
I ran IGO8, Tom tom6 and Destinator6 all on the same device...with plenty of skins and colours and voices etc..
The PDA broke, so I bought a cheap Chinese PNA running Amigo on winCE 6.0.
I have managed to customise it using the DJ Amigo skin, which gives me a whole new display. However even though the DJ skin has a facility to use different icons and a voice in the menu.....they don't work.
Does anyone know a way to achieve five icons and speed zoned voices in Amigo on PNA winCE 6.0?
|
|
| Posted by tamatrai on Tue Sep 15, 2009 9:32 am |
|
Hi
There are many of those skins for Amigo: Gurjon, diMka, Sbertaud13,
jone of them will be OK with your PNA.
Simply google these names.
|
|
| Posted by willton on Mon Sep 12, 2011 3:31 pm |
|
please can you tell us how you got on - thats what I want 5 icons and 5 voice alerts. it seems to be almost impossible to have this on a decent platform which zooms in and out according to speed with icons that are visible.
|
|
|
|


