Home PageFacebookRSS News Feed
PocketGPS
Web
SatNav,GPS,Navigation

Qstarz Travel Recorder BT-Q1000 Platinum review

Date 7th November 2008

Introduction

The Qstarz range of GPS devices have always been at the forefront of the consumer GPS Dataloggers, but the latest version the Qstarz BT-Q1300 Nano has added style to the functionality.


A small and slim GPS: the datalogger is just a little larger than a typical Nokia battery! I am not sure where all the circuitry is stashed but the device has really been miniaturised.


This device is the latest in a range of devices which allow the matching of digital images to GPS tracks using the bundled software. This matching allows you to "tag" your photos with the location, a process known as geotagging or geo referencing.


Whats in the box...

The retail box comes with the Qstarz BT-Q1300 Nano datalogger; a USB to Mini USB cable, a car power adapter with Mini USB connector, a mini CD with the Travel Recorder software, an English User Manual , a multi language quick reference, and a voucher for a 1 month free locr PRO account.


The Qstarz Nano Datalogger

The Qstarz Nano datalogger measures 67mm x 38mm and is just 7mm deep! It weighs in at 22g less than an ounce! Boy this guy is small...


At the top of the GPS is a slot which allows the strap and keyring to be securely attached. The strap is riveted on to the device so if you don't want to use it then it can be cut off, but the action is irreversible. The edges and detailing of the datalogger are in gold plastic, with a funky design on the front. The back of the device is matt black plastic and contains the unit's identification sticker.


On the right hand edge of the Datalogger are the only 2 functional parts of the device: a power/data socket and a multifunction button.


The power/data socket is a Mini USB and will connect to either the supplied car charger or the computer cable. Using both will charge the GPS datalogger, but the computer cable will also transfer your GPS tracks to a computer. More of this later.


The only other thing of note on the device is the multi-function switch on next to the power socket. This is used to turn the device on and off, to set it into datalogging mode, and to record a position. To switch the device on you have to press the switch for 4 seconds. This powers the device and puts in in Bluetooth GPS mode. To initiate the datalogger you need to press the switch again for 2 seconds. When the datalogger is recording pressing the power button briefly will record your current position as a POI.


I find the switch a little difficult to use and have many a time checked it only to find I hadn't set it into logging mode correctly. I think that as this is being targeted at datalogging and geotagging users then it would make a lot more sense for it to enter logging mode when powered on. After all hardly anyone uses Bluetooth GPS receivers nowadays. Not that the unit either works as a datalogger OR a Bluetooth GPS, not both at the same time.


At the bottom of the front of the Qstarz Nano is a set of 4 indicator LEDs. These have the following meanings (left to right) Logger Active, GPS Status, Bluetooth Active, Low Battery/Charging.


Article by Mike Barrett

Qstarz BT-Q1300 Nano GPS datalogger

Qstarz BT-Q1300 Nano GPS datalogger

Qstarz BT-Q1300 Nano GPS datalogger

Qstarz BT-Q1300 Nano GPS datalogger

Qstarz BT-Q1300 Nano GPS datalogger

How does Geotagging work?

How does this geotagging system work? Well the concept is that each picture taken on a digital camera has a timestamp. The datalogger records trackpoints that include the time and the co-ordinates of the location. Software on the computer can match the time of the photo with the tracklog and then add the position information into the control data of the image. This can then be used by a number of different websites to show the picture on a map.


The Qstarz Nano BT-Q1300 in action

The Qstarz is stylish, breaking the traditional black box design. It is also incredibly small, but is smaller better? In some cases size does matter and it may be that in shrinking the datalogger compromises have been made in antenna size and thus the overall performance.


Well I have been playing with the Qstarz Nano for some time now and have compared the performance of the device to that of the Qstarz BT-Q1000 datalogger. Despite the fact that the new Nano has a later and more sensitive GPS Chipset the BT-Q1000 manages to get and retain a fix faster. In my testing the Nano works very well in open countryside and in and around towns and villages.


I did experience problems when testing it in "user" mode. I visited London on a number of occasions. This involved jumping on and off the London Underground (Metro) and going in and out of buildings. Of course there is no way the datalogger can receive GPS signals indoors or underground so obviously it was unable to track then. The main problem was when coming back into the open the device had difficulty getting a fix again. In one of my tests I only had 5 minutes of log data from a whole day.


I did find it somewhat better when using it with more care, standing in open spaces and checking for fix before taking a picture, but this is more than a user would normally do, and even so it still didn't get a fix sometimes.


Again due to its size the datalogger has a smaller battery. I found this was sufficient to log a day's activities, but did need to be recharged for the next day's usage.


Qstarz Travel Recorder Software

The Nano datalogger is no use on its own it needs something to extract the data and use it in a meaningful manner. This is where the Qstarz Travel Recorder software comes in.


The software installs and runs on a PC currently there is no version available for the Mac.


Once the software is loaded you connect the GPS, and start to load the tracklog. This can take a little while if you have a lot of data stored.


Qstarz BT-Q1300 Nano GPS datalogger


Once the tracks are imported they are shown on the main display. This is zoomed out to show the locations of all of your tracks. In the shot below I have zoomed in to the Symonds Yat area where we spent a weekend canoeing and camping.


Qstarz BT-Q1300 Nano GPS datalogger


The main map panel can be switched between Map, Satellite, and Terrain views. The colour coded tracks are displayed on the map and any photos that are geotagged are shown as a camera icon along the track.


To the right you can see the Terrain view with a cyan track heading down river from Kerne Bridge. Clicking on a camera icon highlights the picture taken at that point in a pop-up. This highlighted camera icon has a number of pictures associated with it. These can all be viewed individually using the scroll bar and clicking on an image.


The main tool bar controls the Travel Recorder software. and allows you to exploit the functionality of the application.

Qstarz BT-Q1300 Nano GPS datalogger

Qstarz BT-Q1300 Nano GPS datalogger


The icons on the toolbar have been organised in order of the typical workflow: Read track from Datalogger; Import Pictures from Camera/files; Modify the time synch; Write the Geotagging info to the pictures; Export the pictures to Flickr; Export as HTML (for a web photo album); Open in Google Earth; and Export to Google Earth KML file.


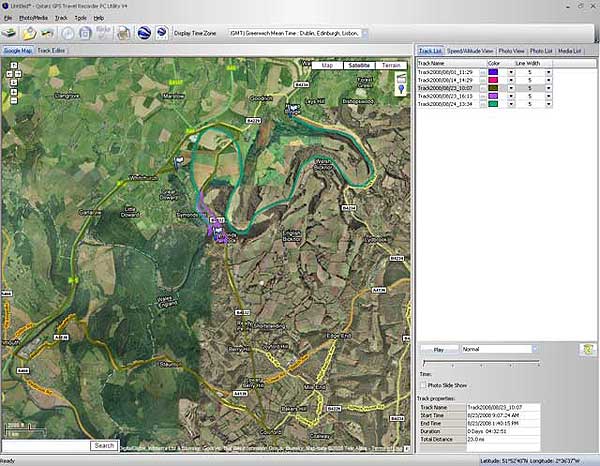
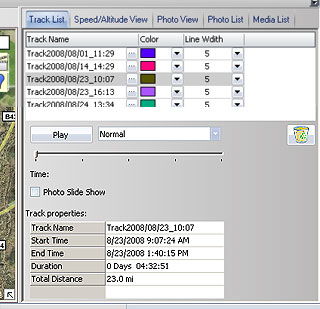
To the right of the main window is a tabbed information panel. The default display is the track list. This lists all the tracks in the project. A project is a collection of tracks and media. Grouping them into projects makes them manageable.


The tracks are all timed, and colour coded. The colour code matches the tracks drawn on the map. If you click one of the colour bars the associated track is displayed in the main map panel.


You can also run a simulation of the track, all this does is run a cursor through the map of the track.


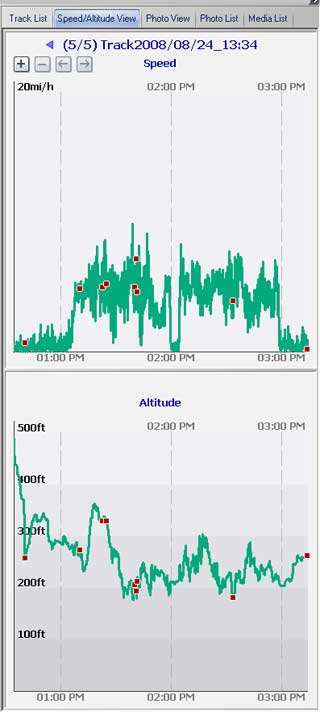
The next tab is the Speed/Altitude View. This shows the speed and altitude profile over the length of the track. As you can see we were not setting any speed records on the river, 4MPH was about the top speed...


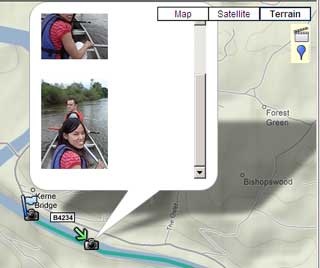
The red dots on the display indicate where I have taken pictures. These pop-up when you move the mouse over them.


The + - and arrow buttons can be used to zoom and scroll the displays. This allows you to examine a particular sequence of the track in more detail.


Looking at the altitude profile you can see some anomalies. I am not sure where the 500ft came from , but that aside it shows drops and rises. I can assure you that we were on a reasonably slow flowing river, and did not negotiate any rapids or experience the water flowing uphill... I can only attribute this to a poor 3D fix, but looking at the track the lat/lon position was spot on.


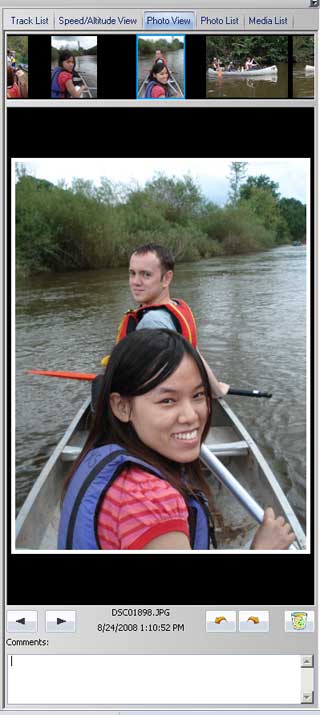
The next tab along is the PhotoView (below right). This shows a film strip at the top with a larger scale of the selected image. You have a number of options in this panel including the rotation of the image or adding a comment to it.


Only the basic filename and image recorded data are shown in this view. To get more details of the image you need to select the next panel the Photo list.


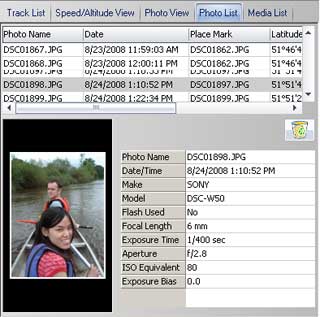
This panel (shown below) has 2 sections: A list of all the images in the project at the top and details for the selected picture at the bottom.


The grid display at the top has a list of all the images and their associated place marks on the map. It also contains other details such as timestamp, location and most importantly a Geo Tagged column.


The Geo Tagged column indicates that the location data has been added to the picture file. This is stored in the EXIF data of the file.


Qstarz BT-Q1300 Nano GPS datalogger


All files have a certain amount of metadata contained in them. This is separate to the actual data content of the file and stores information about the file. Typically this will be creation data, last updated date, last accessed date, etc.


EXIF defines a standard for additional information to be stored about an image. This includes the camera type, some of the settings for the shot, a number of descriptive fields can be added such as title and the place name. For our purposes the important fields are Latitude and Longitude. These allow applications to show the picture on a map.


When you import images into the Qstarz Travel Recorder the picture date/time is matched to the track logs in the project. If the timestamps match then the location is added to the project data for that image. Some pictures may have been taken when the datalogger was switched off, or indoors with no signal.


When you are happy that the locations are correctly adjusted you must write the GPS info to the files using the icon on the toolbar. This will then permanently save the location in the file for other applications to use.


The EXIF data for the selected image is shown in the lower part of the Photo List panel below. You can just about make out the fact that I am using a Sony DSC-W50 (sadly demised since that outing) and the exposure settings of 1/400th sec at F2.8...


Qstarz BT-Q1300 Nano GPS datalogger

There are a number of export options in the Travel Recorder software. The first is to simply GeoTag the images and then import the files into your favourite image library application. I prefer to use Picasa so just use the Travel Recorder to GeoTag my pictures and then use Aperture (on my Mac) to organise them and export to Picasa to publish them. There are also options to export directly to Flikr, create a Google Earth KML file (Google Earth was originally called Keyhole hence KML: Keyhole Markup Language) or directly to Google earth.


Conclusions

The Qstarz Nano BT-Q1300 GPS datalogger is a stylish and miniature device, it is very functional and works well in the open, but is a little compromised in urban environments with tall buildings. The software to analyse and tag your photos is the best and easiest to use that I have tested to date.


My main reservation with the Qstarz Nano is the slightly degraded performance in areas with marginal GPS signal reception over its predecessor the Qstarz BT-Q1000 Platinum. A secondary concern is the slightly fiddly multipurpose button, I would have preferred to have 2 or more buttons to separate the functionality, but then this is a balance between style and functionality...


At £65 from SuperETrader in the UK or $100 from BuyGPSNow in the US it is £10/$10 more expensive, you need to weigh up size and style against price and better urban performance.

References

Manufacturers Website

www.qstarz.com

Pocket GPS Contributor

Mike Barrett

Pocket GPS Contributor Website

www.Pocketgpsworld.com


Comments
Posted by ski2mi on Sat Jun 27, 2009 12:46 am Reply with quote

Great review.

Quite a few other reviewers have noted the same concern about having to press the button twice, once for 4s to turn on the device, and again for 2s to turn on logging.

Qstarz have apparently been listening, as with the current shipping version, after powering on, logging is on by default, and a 2-second press turns logging off.

This is far more convenient, and makes having a single button perfectly usable.


Reply to topic

CamerAlert Apps


iOS QR Code


Android QR Code


© Terms & Privacy

GPS Shopping