
Review by Mike Barrett
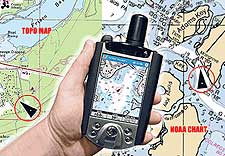
Maptech Outdoor Navigator
The latest topographical software product from Maptech is called Outdoor Navigator. This has been available on the Palm platform for a little while now and was recently released for the PocketPC.
 The Maptech Outdoor Navigator is not an updated product, but a completely new development. This application turns the tradition raster based topographical GPS implementations upside down. Most other programs started life on the PC and then moved over to the PDA, Outdoor Navigator has been designed for the PDA from the start. The Maptech Outdoor Navigator is not an updated product, but a completely new development. This application turns the tradition raster based topographical GPS implementations upside down. Most other programs started life on the PC and then moved over to the PDA, Outdoor Navigator has been designed for the PDA from the start.
Outdoor Navigator is also different in that it has a totally Internet based distribution system for both application and mapping data. Having said that a PC is still required to access the map data and download the map files to you PDA storage card.
Outdoor Navigator Overview
Well despite the name Outdoor Navigator is primarily a map display application. Bearing in mind this is the first release there is plenty of scope for additional features to be added. As mentioned above the maps are downloaded from the Maptech MapServer, this has a special section for Outdoor Navigator where you can download either USGS Topographical maps or NOAA nautical charts.
The concept is quite simple, you register on the Maptech website, pay an annual subscription, and download and install the software on your PC then find the maps you want on the map server and download them. The downloaded maps are then transferred to the PDA and you are ready to go. You then have a year in which you can download and store any of the available maps. When the subscription expires the maps you have downloaded will still work so will the application. You can then renew you subscription if you need to download any further maps.
Outdoor Navigator Software Features (Manufacturers Description):
Pan maps and charts using the touch screen - drag your finger and the map drags with it.
Quickly Zoom and Scale using hotkeys. 
Real-time GPS tracking - Requires connecting a NMEA 0183 GPS.
Enter a waypoint on the screen using your finger or stylus.
Data Boxes can be turned on and off quickly. Their readouts include:
- Speed over ground
- Average speed over ground
- Course over ground
- GPS position
- Waypoint range
- Waypoint bearing
- Waypoint time to go
- Pen range
- Pen bearing
- Pen position.
Map and Chart Features
Full continental United States and Alaska Coverage - access to over 60,000 maps and charts. - USGS topographic maps - 1:24 /25,000 scale (7.5 minute series), 1:100,000 scale and 1:250,000 scale
- NOAA nautical charts - all scales from overview charts to harbor charts
First Things First: Getting signed up.
The Outdoor Navigator software can be downloaded and used as a limited usage trial. When the trial finishes you need to purchase a subscription to continue the use of the product. This is really good as you can test the full features of the software with no financial outlay. Be careful though as you can only run the PDA software 30 times so make sure you have got your subscription paid for before going on a major expedition.
Maptech have a variety of options available for purchasing a subscription. The two main ones are to buy your subscription from the Maptech site with either a CD to be sent via the post, or more usefully, an Internet download version. Both versions cost $99.00 which gives you the PDA software and access to the Maps for a full year. Other options available are renewal subscriptions, GPS devices and a Outdoor Navigator and GPS bundle for Palm PDAs.
Having signed up you can now think about the maps you will need. These are downloaded from the Maptech Map Server.
Getting the maps you need.
Maptech are well know for their MapServer which allows you to view either Topographical maps, Nautical or Aviation charts, or Aerial photos. This has been enhanced to locate and download Topo maps and Nautical charts of the United States . There are also "Destination Packs" which cover the Appalachian Trail , Coastal Boating, and National Parks enabling popular areas to be downloaded easily.
Downloading from the Maptech MapServer is not too difficult as long as you know the area you want to obtain maps for. That sounds a little silly really, but all the USGS Quads are allocated names, again fine if you know the names but what if you are going to somewhere like Lake Mead how do you download maps of that area?
Well there are two bits of information needed a place or name and a state. I just happen to know that Lake Mead is in Arizona (yes I know and Nevada too) typing both the name and selecting Arizona state in the Mapserver results in two options being available: Lake Mead National Recreation Area and Lake Mead. If you select Nevada you get some different selections.
Selecting either displays the map screen and a selection of maps available at that location.
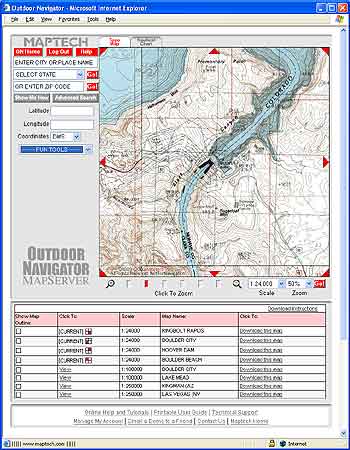
This map screen is split into a number of functional areas: The Map Viewport, The Search Selection; The Map selection and the Links area.
The Map Viewport
The Map Viewport has a number of controls which allow you to move and manipulate the displayed map or chart.
The most useful controls are at the bottom of the viewport which are the "Click to Zoom", Scale and Zoom. The "Click to Zoom" selects both the scale and zoom values in one click, ranging from 1:24,000 at 100% zoom down to 1:250,000 at 50% zoom. This is extremely handy when you select an area that you are not familiar with and need to select which maps to download, more of which later.
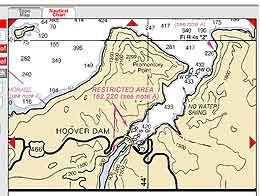 In this case there is both a “Topo Map” and “Nautical Chart” tab. Clicking on the Nautical Chart tab replaces the USGS digital map with a NOAA nautical Chart. In this case there is both a “Topo Map” and “Nautical Chart” tab. Clicking on the Nautical Chart tab replaces the USGS digital map with a NOAA nautical Chart.
This was really an experiment as I wasn't sure if there would be nautical charts available for the inland waterways. I was surprised to find that there was for Lake Mead. I am not sure what the situation is with other lakes and large rivers.
My real interest was the NOAA nautical charts around the Florida Keys, but more of that later.
Another useful feature of the map viewport is if you click anywhere within the map then this point is centred on the display. The map also has eight triangle controls to shift the map or chart in the indicated direction.
The Search Selection Panel
The search selection area provides some overall control for the MapSearch engine, along with the main search tool entry fields.
You can search for a place either by name and state, zip code. It is a real prerequisite that you know where you want to go here. This may sound a bit silly saying that but you would be surprised how many people are not able to associate a town or place with a particular State. Consider us poor Brits we still think that Paris is in France not Texas.
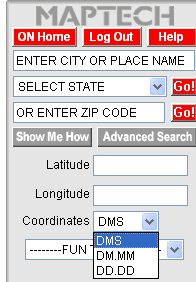
You can enter more specific details by using the advanced search option. This allows not only Place/State or Zip Code, but also introduces Map or Chart Name, Map or Chart Number, and also searching by co-ordinates.
The final part of the search panel is the Latitude and Longitude display. When you move your mouse pointer over the Map viewport the precise position is displayed here. Using the coordinates drop down box you can specify how the position is displayed.
The Map or Nautical Chart Selection
Having selected the area you need charts or maps for then you will be presented at the bottom of the display with a grid of maps or charts that are covered by your selection.
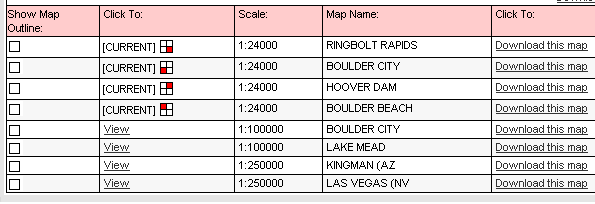
From this grid you can select to view the map outline by clicking the tickbox on the left of the grid. This will overlay the map or chart showing where the map or chart fits into the displayed view. Looking at the "Click to" column this gives an indication where in the view the map is (if there are only 2 or 4) or gives the option to view the individual maps or charts. This is the useful feature for selection that I mentioned above. If you zoom out to 1:250,000 then you can click"Show Map Outline" to decide which map or chart you want to download.
Downloading Maps and NOAA Nautical Charts
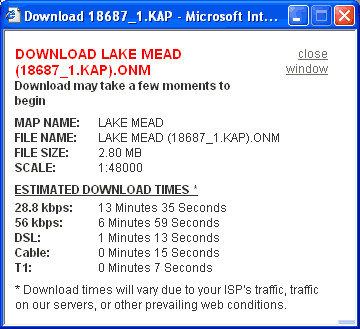 To download the chart simply click on the Download this map link. To download the chart simply click on the Download this map link.
This will display the download window which provides information about the map or chart being downloaded. This includes the chart name, size and approximate download times.
When the download window is displayed the chart will start to download onto your PC automatically. This will be downloaded to the "My OutdoorNav Maps" directory in your My Documents folder.
This method is not bad if you only have a couple of maps to download. If however you have a large number that you require then things are a little different. You can start off 4 or 5 downloads then the communications link seems to get jammed a little and it will not allow you to download more maps until the current ones have been completed.
In practice this may not be too much of an issue if you have a whole evening on your computer and you just set of downloads when the previous one finishes. Of course you then forget where you were and start downloading the same maps again.
At the end of this process you will end up with a number of files stored on your local computer. To transfer them to your all you need to do is to double click on the file you want to copy and this opens the transfer application. The transfer application must be run when ActiveSync is running and will search your PDA for storage cards and prompt you for a destination. Files will always be stored in the OutdoorNav directory off the root directory. You cannot change this location, but it does have the benefit of being standard so that you can take a SD card out of an iPAQ and use it directly in your Palm Tungsten T.
A nice additional feature would be a download manager, either at the Maptech MapServer end or on the
PC. This could then queue up map and chart requests while you use your time more productively.
One thing you may have noticed from the above descriptions is that the Outdoor Navigator maps are only available in the USA at the moment. In fact coverage is for Mainland USA and Alaska.
 Installing Outdoor Navigator Installing Outdoor Navigator
The installation of the Maptech Outdoor is straightforward all you need to do is download the correct software for your PDA (Palm or PocketPC) and run the program. This will both install the application and copy some sample maps onto your device.
You may find on installation that you get an error message as shown to the right. Hitting OK continues the installation and there doesn't appear to be any problems running the application despite the error. This error occurs because the NavMan sleeve software is installed even if you do not have one.
The final step of the installation is to license the software. This requires a combination of: Product ID, Installation code and Activation code. The product code will be supplied when you purchase your subscription, the Installation code will be generated when you install the application. Using these two codes you go to the Maptech site and register the product. This will give you an activation code. Type that into the appropriate box and you are ready to go.
If you do not purchase a subscription then you can run Outdoor Navigator 30 times in trial mode. This allows full access to the application and maps so you can fully evaluate the system before you buy it.
Outdoor Navigator Functions
As mentioned above Outdoor Navigator is a brand new mapping product. As such it is not the most feature rich application on the market. Its main areas of functionality are:
- Display Raster maps
- Interface to GPS to show current position
- Display of various information values
- Panning, Scrolling and Zooming of maps
- Creation and Management of Waypoints
- Navigation to Waypoint
Loading and Managing Maps
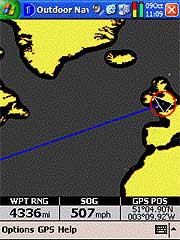
Outdoor Navigator will not function if the supplied basemap of the World is not on the storecard. This is installed automatically when you install the software. So whatever you do don't delete it because you think it is not needed.
The basemap is not the best in the world, but does give you an idea of where in the world you are. Hopefully you would have some kind of clue anyway.
The picture to the right above shows the basemap with the gps fixed and running. The circle around the GPS arrow indicator indicates that the "follow" (see later) mode is not in effect. The blue line is the direct path to Orlando Sanford airport. Which is 4336 miles away as the crow flies.
 Maps do not load automatically unless the GPS "Follow" mode has been selected see later for details. Maps do not load automatically unless the GPS "Follow" mode has been selected see later for details.
You can however tap and hold to get a context sensitive menu which allows you to select a new chart either at the pen position, the GPS position, or from all of the maps on the PDA. To help you select the most appropriate map for your needs you can sort the maps/charts by either scale, name or identifier.
The image to the left shows the map selection screen as I used it in the Florida Keys around the Key Largo area. You can see that there are 4 maps of different scales available at that position: Rock Harbor and Homestead are USGS maps, Miami to Marathon is a marine chart, and the base map is the last on the list.
At the bottom of the display is a set of buttons irritatingly I always highlighted the chart I wanted then hit the done button. This should really be a cancel button as it just returns you to the main display. The select button actually loads the highlighted chart.
You can also view any details of the map or chart by hitting the details button. This provides a bit more information about the chart including the file name and its location on the PDA.
GPS Interface
The Outdoor Navigator application would just be a simple map viewer without a GPS interface. Well Maptech have provided comprehensive GPS functionality.
There are options to connect to a NMEA data source. I have tried this on both an iPaq 2210 with a mouse type GPS and also a variety of BT GPS receivers. I also tried it on a Palm Tungsten T2 with my Emtac BT GPS. All of these configurations worked flawlessly.
The GPS can be used in a number of Modes. The status of these are indicated by the GPS pointer. The GPS mode is selected using the rightmost button of the PDA. Press once to toggle the GPS Follow mode on and off. Press and hold to activate the GPS Follow Plus mode. The modes are:
 |
No GPS.
When the GPS is not fixed you will see the triangle GPS position indicator coloured red. If the signal is weak than this will be coloured grey. |
 |
GPS Follow Mode
If you are receiving GPS positioning data the GPS Position indicator is solid black. The GPS follow mode ensures that the GPS position is kept visible on screen. When you go over the edge of one map the next map will be loaded in this mode. As you can see from the image to the left the black indicator can be difficult to see on some charts.
|
 |
GPS Follow Plus Mode
In the GPS Follow Plus mode the software not only keeps the GPS position on the display, but it also ensures that the most detailed map is displayed. The image to the left shows a + sign in the GPS indicator confirming that the GPS Follow Plus mode is active.
This mode is extremely useful when you have harbor areas which can have charts as detailed as 1:5,000 which will show all obstructions in great detail, where you would also be traveling slow enough to use that information. Out on the open sea you would have larger scale maps allowing you to see more of your course. In the above example the most detailed map of Key Largo happened to be a 1:24,000 USGS Map which was loaded in with my marine charts. I wasn't quite organised properly for that trip.
|
 |
Normal GPS Mode
In the Normal GPS Mode a red circle is shown around the GPS Position indicator. When in this mode the map does not move. |
Information Display
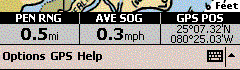
The information boxes are toggled by using the leftmost button on the PDA. These boxes, shown right, provide a wealth of information to help you navigate.
When the information boxes are displayed you can select the precise contents of the box simply by tapping in the box. This cycles through all the available options. A lot of the options are dependant on a GPS fix to provide meaningful data. If the gps is not fixed then these data will be shown in red.
The information box options are as follows:
SOG |
Speed Over Ground. This displays your current velocity as reported by the GPS receiver. |
AVE SOG |
Average SOG. This is the calculated average speed over the last minute. |
COG |
Course Over Ground. This is your course bearing as determined by the GPS receiver. |
GPS POS |
GPS Position. This is the latitude and longitude as transmitted by the GPS receiver. Currently this is the only co-ordinate system displayed. |
WPT RNG |
Waypoint Range. This displays the distance to the active waypoint (see below) in your selected units of measurement. |
WPT BRG |
Waypoint Bearing. This is the bearing you need to follow to arrive at the active waypoint. |
WPT TTG |
Waypoint Time To Go. This is the time it will take to reach the active waypoint if you continue to travel at the same average speed. |
PEN RNG |
Pen Range. When you tap on the screen you create a "Pen Position" the next data items use this position to give you figures. The Pen Range is the straight line distance from the pen position to the GPS Position. |
PEN BRG |
Pen Bearing. The pen bearing is the heading in degrees from the GPS position to the Pen Position. |
PEN POS |
Pen Position. The pen position is the Latitude and Longitude of the place that you last tapped on the screen. Note that there is no indication of where you actually tapped the screen. |
A useful addition to the data boxes would be a "PEN TTG" readout. This could then be used to determine timings to intermediate points, this could be useful in busy shipping areas to help you determine if you need to take avoiding action, or when hiking to give you an idea of when you will top the next rise etc.
Waypoint Management
Outdoor Navigator supports waypoints in a limited manner.
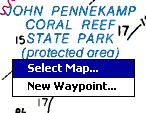 To add a waypoint all you need to do is to tap and hold at the point that you want to create the waypoint. This will display the context menu as shown to the left. Select the New Waypoint ... option and you will be presented with a Waypoint Detail screen. To add a waypoint all you need to do is to tap and hold at the point that you want to create the waypoint. This will display the context menu as shown to the left. Select the New Waypoint ... option and you will be presented with a Waypoint Detail screen. 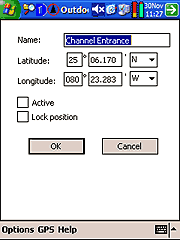
The Waypoint detail screen will be displayed with a name of "No name" and the co-ordinates of the position you tapped on the main display. All of these items can be changed. In fact this is the way I entered the waypoints for Key Largo Dry Rocks and the other dive sites we visited. I obtained the Lat/Lon co-ordinates from the web and just typed them in on this display. I then located the waypoints and moved them to the specific position I wanted them on the map.
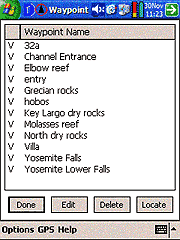 The waypoints are accessed from the Waypoints... entry in the Options menu. This will display the Waypoints list as shown to the right. The waypoints are accessed from the Waypoints... entry in the Options menu. This will display the Waypoints list as shown to the right.
This display has two columns, a status indicator and the waypoint name. The status indicator can be either V, A or blank. If it is V then the waypoint is visible on the map. If the indicator is blank then the waypoint is not shown on the current map or chart. The showing or hiding of waypoints allows you to temporarily remove selected waypoints from view. If the indicator is an A then the waypoint is active. Active waypoints are described in more detail below. There is currently a limit of 50 visible waypoints.
The waypoints are managed from this list. You have options to Edit and delete them. You can also find and centre the waypoint on the screen.
 Editing a waypoint is reasonably simple. You can find a waypoint either by using the waypoint list above or by finding it on the map. Once found you can drag the waypoint to another location with our pen. This allows for very accurate positioning of the waypoint. Editing a waypoint is reasonably simple. You can find a waypoint either by using the waypoint list above or by finding it on the map. Once found you can drag the waypoint to another location with our pen. This allows for very accurate positioning of the waypoint.
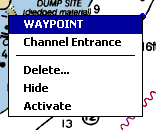
If you tap and hold you get a context menu as shown on the right. The waypoint detail is available from this along with other waypoint management facilities.
 The image to the left highlights a problem I found with waypoints in Outdoor Navigator. In that small area there are two waypoints shown: Directly above the GPS indicator and slightly above and to the right of the first. The waypoints are coloured blue and this is not configurable. It is just about possible to see them if you know what you are looking for, but when traveling at 25 knots on a vibrating boat they would be impossible to see. Being able to colour waypoints to contrast the chart would make a big improvement. The ability to display the waypoint name would also help in this area. The image to the left highlights a problem I found with waypoints in Outdoor Navigator. In that small area there are two waypoints shown: Directly above the GPS indicator and slightly above and to the right of the first. The waypoints are coloured blue and this is not configurable. It is just about possible to see them if you know what you are looking for, but when traveling at 25 knots on a vibrating boat they would be impossible to see. Being able to colour waypoints to contrast the chart would make a big improvement. The ability to display the waypoint name would also help in this area.
Another feature I would like to see is the introduction of waypoint icons so that buoys and other landmarks are immediately distinguishable.
The management of the waypoints will also become a problem as you use the software more and build up your waypoint library. Currently the waypoints are organised in a flat structure, which will probably work OK for up to about 100 waypoints, but what happens when you have 200, 500, 1000. From the Waypoint List shown above you can see that I have already collected waypoints in Yosemite as well as the Florida Keys, having the ability to separate these and maybe have a tree like management system so that Yosemite is placed in one area and the Keys in another.
Navigating to Waypoints
Navigating is probably too strong a word for the function available in Outdoor Navigator, a more accurate description would be pointer to waypoint. The navigation facilities available are selecting and "Activating" a waypoint. This will then draw a line between the GPS position and the waypoint.
The waypoint can be activated either by tap and hold on the way point or selecting the waypoint in the list, and ticking activate in the Waypoint detail.
Outdoor Navigator in action
 So that is the product description over what is it like in action? So that is the product description over what is it like in action?
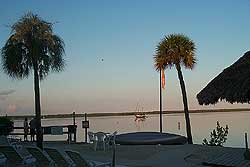
Quite a few years ago I visited Key Largo with my family and we rented a boat from John Pennekamp State Park to take a trip through the Largo Sound out to the coral reefs for snorkeling. I had some experience of sailing before so was not too daunted by the prospect of the trip. To cut a long story short I did not take note of my location points when exiting the channel from Largo Sound and when returning I mistook my landmarks and ran the boat aground on a mud bank. There was no damage done except to my pride.
The key lesson I learnt from this experience was to be more aware of my surroundings and to take more notice of landmarks. It is surprising how confusing miles of mangroves on the shoreline can be from a mile out at sea. That aside this was one of the reasons I became interested in GPS navigation.
This year we decided to do a return trip and do some more snorkeling., but this time I was going to be better prepared. I had already downloaded both Marine Charts and Topo maps of the area, and had set up some waypoints before leaving the UK.
 So off we set to John Pennekamp State Park only to find that the park concession had just changed and they now required a "Safe Boating" certificate before a boat could be hired. Almost fell at the first hurdle but the guy in the rental shop helped us find a boat hire company outside the park, and we set off there. So off we set to John Pennekamp State Park only to find that the park concession had just changed and they now required a "Safe Boating" certificate before a boat could be hired. Almost fell at the first hurdle but the guy in the rental shop helped us find a boat hire company outside the park, and we set off there.
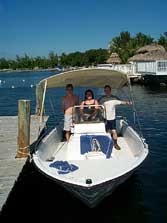
 We used Hobos just up the road and actually saved quite a bit of money in the process. We rented a 23foot boat with a Bimi top as can be seen on the left. We used Hobos just up the road and actually saved quite a bit of money in the process. We rented a 23foot boat with a Bimi top as can be seen on the left.
The first thing to do was set a waypoint for the boatyard. Imagine the embarrassment of not being able to find the place we rented the boat from!
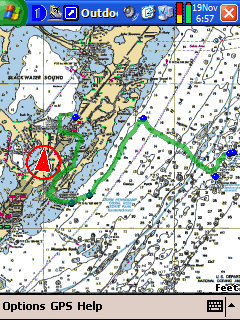
The picture to the right shows an overview of the route we took. The green line has been drawn on top of the map to show where we went (this is not part of Outdoor Navigator). The whole trip was about 25 Nautical Miles navigating through some narrow channels and out on the open seas.
 After leaving the boat yard and getting used to the boat's controls we headed for Adams Cut After leaving the boat yard and getting used to the boat's controls we headed for Adams Cut
a channel connecting the Gulf side of the Florida Keys to the Atlantic side. The image to the left shows us just about to come out of the channel. The map data was very accurate and had us pinpointed.
 Throughout the trip I had my iPAQ 2210 mounted using a suction mount on the perspex wind deflector, the Emtac BT GPS was firmly tucked away in my backpack toward the aft of the boat. This setup worked very well the only issue being visibility of the PDA screen in the sunlight. Throughout the trip I had my iPAQ 2210 mounted using a suction mount on the perspex wind deflector, the Emtac BT GPS was firmly tucked away in my backpack toward the aft of the boat. This setup worked very well the only issue being visibility of the PDA screen in the sunlight.
After coming through Adams Cut we headed across Largo Sound to a marked channel exiting to the Atlantic. As we approached the exit of the Channel I set another waypoint to guide me back later.
We then cruised out to the Grecian Rocks by following the coast until we found a marker then followed subsequent markers out to the dive site.
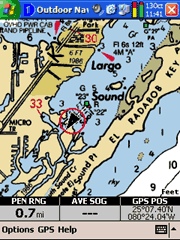
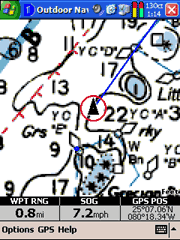 As we approached the Grecian Rocks I zoomed in to give additional detail. The picture to the right shows us moving between the Grecian Rocks and Largo Dry Rocks. The blue line shows the course we should take, but obviously the course can be seen to go right over a 1 metre shallow area. We skirted round this with no problems however this shallow was not marked and had it not been for the Outdoor Navigator and GPS positioning we could have risked grounding. As we approached the Grecian Rocks I zoomed in to give additional detail. The picture to the right shows us moving between the Grecian Rocks and Largo Dry Rocks. The blue line shows the course we should take, but obviously the course can be seen to go right over a 1 metre shallow area. We skirted round this with no problems however this shallow was not marked and had it not been for the Outdoor Navigator and GPS positioning we could have risked grounding.
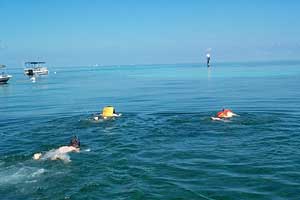 So was it worth going out there? It certainly was! The picture to the left shows me and my boys swimming with all sorts of tropical fish, including a shoal of barracuda. So was it worth going out there? It certainly was! The picture to the left shows me and my boys swimming with all sorts of tropical fish, including a shoal of barracuda.
Coming back was simplicity itself. I had a set of waypoints created on our way out which I used to activate and navigate to.
 The only problem with this was trying to locate and activate the waypoints whilst traveling at speed over the water. It was almost a dash to the waypoint and then stop whilst the next point on the route home was located. The only problem with this was trying to locate and activate the waypoints whilst traveling at speed over the water. It was almost a dash to the waypoint and then stop whilst the next point on the route home was located.
As can be seen from the picture to the right we were traveling at a speed of 21.5 mph (what happened to knots?) and although the sea was very calm there was still a slight swell which prevented easy operation of the PDA and boat at the same time.
There are two things that would have made the experience much better: a visible track log, and the ability to link waypoints into a route. With a visible track log it would be simple to return the way I had come. With basic routing the waypoints would automatically activate when the current one is passed. Either of these would have made the trip much easier to handle, however we did have a good time which was complicated further by having to start on the Gulf side of the Keys. This was achieved in the confidence that I knew exactly where I was in a landscape with a shortage of landmarks.
Addendum
Since the visit to the Keys and the publication of this review Maptech have released version 1.3 of Outdoor Navigator for the Palm. This has some new functionality, specifically routes enabling a number of waypoints to be linked and the automatic activation of the next point in the route. I have not been able to test this yet.
Conclusion
For what it is Outdoor Navigator is an excellent product, but you must bear in mind that this is a new development and as such is not yet rich in features. One of my main requirements was routing which has already been implemented in the Palm version of the software. I could put a whole wishlist of items I would like to see here, but I think it will be better to open a forum thread and let you the users air your views. Click here to contribute to the Outdoor Navigator wishlist.
That said it is terrific value for money. Where else can you gain access to all the maps you want both topographical and marine? The maps suffer from the same limitations as all USGS DRG products do, but they are of excellent quality, clarity and contrast.
There is a restriction in the coverage of mapping to the United States, if like me you are a regular visitor this package gives you the opportunity to pre-purchase your maps and do some planning before traveling It would be nice if the coverage could be expanded to allow users with mapping products on their computers (such as the Maptech Marine Charts) to be used.
And remember once your subscription has expired you are still able to use the cartography you purchased and downloaded.
|


