|
Now
the details of how I achieved the above
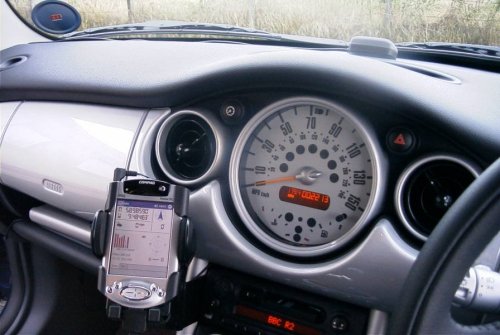
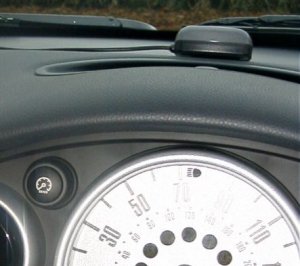
The spot chosen for the iPAQ
was to the left of the radio in the centre console of the car below the
Speedometer.
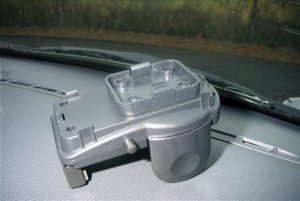
The
Dashmount
bracket which is designed for fitting a mobile phone was mounted on to the radio
mounting screws as shown in the photo on the
Dashmount product page.
The instructions supplied with
the Dashmount Bracket indicate that it is a simple matter of removing a couple
of screws and the left vertical pillar of the console to gain access to the two
radio mounting screws. Unfortunately it isn't quite as simple as this in
practice!
In order to get the left
pillar off requires a considerable amount of work and care. The problem is that
even though the bolts for the pillar are removed, the pillar cannot be extracted
because it is firmly stuck into pieces of polystyrene under the gearshift/cup
holder console.
Fortunately a couple of
threads in the MINI2 forums came to the rescue. Details were found on how to extract the pillar by partly removing the gear
stick console and the dashtrim around the speedo. Some Torx screws need to be
removed, so a set of small Torx wrenches were purchased from
Halfords.
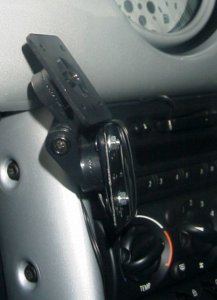
The next step was to fit the
Arkon PDA mount
to the Dashmount bracket:
The Arkon multiangle mount kit
consists of two parts, a holder for the iPAQ with adjustable sidegrips which
clips on to the adjustable mount via a sort of keyhole clip arrangement.
Originally I had planned to
bolt the multiangle mount on to the
front
of the Dashmount bracket. When I tried this I found that iPAQ was too low down
and got in the way of the gear stick. It was also fairly wobbly with a fair
amount of play in some of the joints.

I found that I could bolt the
mount onto the
rear
of the dashmount bracket and then swivel the mount over the top of the bracket,
this put the iPAQ at a much better height and also reduced the wobble and play
considerably.
Further investigation showed
that the PDA holder could move about on its keyhole mount, this was cured by a
drop of superglue between the multiangle mount and the PDA Holder. The PDA
holder can still be removed from the mount because the front face of the mount
unclips from the rest of moveable part.
The PDA holder grips the sides
of the iPAQ and also has two adjustable feet at the bottom to support the
weight. These feet can be slid up against the iPAQ connector at the bottom.
I felt that the
naked
iPAQ 3870 looked a little vulnerable in the mount, so I decided to leave it in
its protective sleeve. I had to remove the screen dustcover completely since it
got in the way.
If the metal pin that holds
the dustcover in place is removed then the cover can easily be refitted when the
iPAQ is not fitted in the car.
The iPAQ screen has had a
WriterRight screen protect film applied to it. A tip to fitting this is to dip
the protective film in some water that has one drop of washing up liquid in it
and then squeegee the film into place. This way you do get a second chance to
align it properly. After a couple of hours the water will dry out and no bubbles
will be left under the film, a perfect job!
The
Holux
SuperMouse GPS was mounted onto the top of the dashboard with self adhesive
velcro strips in the centre just behind the front screen vents.
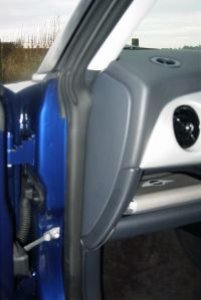
The cable runs to the left
side of the dash and then is neatly tucked into the gap between the dash and the
side. The cable then runs down the side of the front passenger door frame behind
the rubber sealing strip and back out into the passenger parcel shelf. It
continues along under the rubber mat on the passenger shelf, hidden from sight. All of this can be easily removed if the GPS is needed in another vehicle.
The cable supplied for
powering the Holux and the iPAQ consists of a cigar lighter power adaptor which
has a Y junction, one half going to the iPAQ connector and the other to a PS2
style plug which mates with the PS2 socket on the end of the Holux lead.
The power cable can be hidden
out of sight by tying it up into a neat bundle behind the centre console.
I found a small black 'P-Clip'
in my junk box and fitted that to one of the dashboard mounting screws below the
passenger shelf, this was used to hold the cable with the PS2 connector coming
from the cigar lighter.
Finally the cassette adaptor
was fitted into the cassette player slot and the excess wire was wound around
the metal part of the dashmount bracket leaving just enough to allow the 3.5mm
jack plug to be put into the socket on the top of the iPAQ when required.
|