The Garmin Edge 305 Manufacturers Specs
The following specifications have been obtained from the Garmin website www.garmin.com:
Specifications
Training timer features Training data: Can display training time, pace, distance, lap pace, lap time, lap distance, average and best pace, elevation and calories
Customizable screens: Choose from up to 37 data types
Lap History: Automatically records up to 1000 laps by day or week; stores approximately two years of data. Download histories to your PC using included software
Training assistant Courses: Download recorded courses and compete against previous workouts
Auto Pause®: Automatically pauses the training timer when you slow down below a specified resting pace; timer resumes when you start running again
Auto Lap®: Automatically triggers a lap when you reach a specified distance or location. Allows you to run anywhere and still get accurate performance data
Auto Scroll: Cycles through data pages during a workout
Multi-sport: Set up profiles for running, biking and another sport
Advanced workouts: Set up workouts with specific durations and targets (speed or heart rate)
Quick workouts: Allows you to input training goals based on time, distance and pace
Virtual Partner™: Displays a graphic “virtual partner” that will run with the set goal, so you can see at a glance if you are keeping up or falling behind. Works with courses and workout features
Pace alert: Alarm sounds if you are slower or faster than the pace you've input
Time/distance alert: Alarm sounds when you reach the specified time or distance
Interval training : Allows you to set up exercise and rest intervals and number of reps
Navigation features Receiver: SiRFstarIII™ high-sensitivity GPS receiver
Antenna: Built-in patch; points to the sky when wrist’s in motion for optimum performance
Mark location: Mark and save up to 100 locations
Find location: Look up and navigate to stored locations
Map mode: Electronic map shows your location, along with marked locations. Pointer arrow shows direction to travel when navigating to a stored location
Physical
Display: 1.3"W x .8"H, 160 x 100 pixels
Size: 2.1"W x 2.7"H x .7"D
Case: Waterproof to IEC 60529 IPX7 standards
Temperature range: -4° to 140°F (-20°C to 60°C)
Analyze Workouts
Garmin Training Center™: Included software lets you create and schedule workouts, analyze your data and store it. Full comparability with Windows and future full compatibility with Mac
MotionBased™: Web-based application from Garmin that provides more in-depth analysis of your workouts. MotionBased.com provides an online training log, interactive mapping and the TrailNetwork, which allows you to post and share routes with fellow athletes. Full compatibility with Windows and future full comparability with Mac
Features unique to the 305 Heart rate monitor:
wireless design; eliminates crosstalk
Display: Shows heart rate (beats per minute) and zone (between 1 and 5)
Alerts: Alarm sounds if you reach specified minimum or maximum heart rate
Forerunner series comparison guide
Here's how the units are different:
Forerunner 205:
Measures time, distance, pace, altitude and calories burned
Forerunner 305:
Measures heart rate, time, distance, pace, altitude and calories burned
Compatible with Garmin speed/cadence sensor, GSC 10, to monitor pedaling cadence when cycling
|
|
The Garmin Edge 305 review
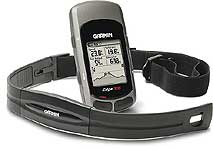
The Garmin Edge 305 comes in 3 different configurations these are dependent on the accessories bundled with the GPS. The available accessories for the Edge 305 are a heart rate monitor, and a cadence monitor. The Edge 305 is sold with either one or the other or both.
Strangely I took the option of both. I am of the opinion that there is no such thing as too much data. I prefer information overload...
|
 |
Whichever bundle you choose the main GPS receiver comes with a USB cable, a mains power adapter, two mounting options, software CD and instruction booklet.
The cadence sensor and the heart rate monitor were individually packaged in their own boxes. This makes it easy for Garmin and the retailers to create the system bundles.
Installing the Edge 305 and Sensors
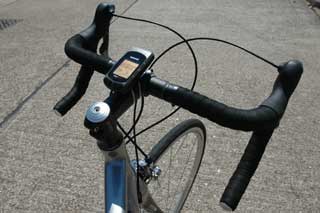
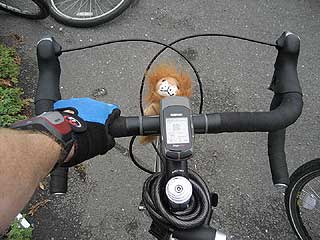
Now I actually own a number of bikes but my main work horses are a Specialized Roubaix road bike and a Claud Butler hybrid for touring and rough road work. As mentioned above the Edge came with 2 mounting options. Excellent for me as I can mount the GPS on the handlebars of both bikes.
I had more problems deciding what to do with the cadence sensor. Well not really I use the Specialized Roubaix for my road cycling and training so that bike was obviously going to get the cadence sensor. The heart monitor doesn't matter of course as it is not attached to either bikes, just to me.
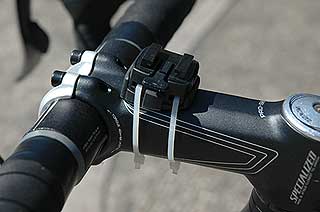
Installing the handlebar mount was quite simple. There are a number of possible ways to fix it. You can either place it on the handlebar or the stem. Either way you need to be careful to orient it correctly otherwise the GPS will be the wrong way up.
Garmin even provide a wedge allowing a slight adjustment of the angle for the Edge. this allows you to mount it for optimal viewing whilst riding. Bear in mind that if you are looking at the GPS your attention is not on the road and any information you get from the GPS should be gleaned as quickly as possible for safety's sake.
Once you are happy with the position the mount is fixed using a pair of cable ties. At first I thought this was a bit of a strange arrangement, but it is effective and works very well in practice. Garmin do provide some additional ties, but a trip to your local auto parts store will replace and shortage you may have from moving the mount about.
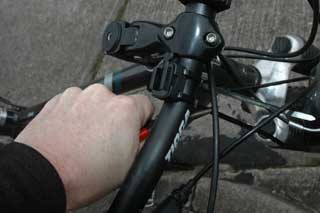
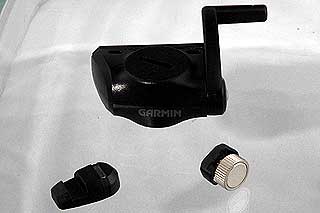
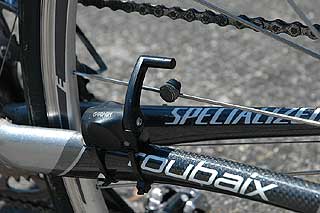
The cadence sensor actually has 3 components: The wireless main unit and 2 magnets. One of the magnets is attached to the pedal crankshaft this pulses the cadence, the other attaches to the spokes and provides speed data. You might question the speed data, but there will be times when the GPS signal is not available this allows the full telemetry to still be recorded.
Fitting the cadence sensor was a little more tricky as all three components need to be correctly aligned. I started by fitting the pedal crank magnet then the cadence sensor and finally the speed sensor. This was quite simple on the Claud Butler as the frame geometry was very accommodating. On the Specialized Roubaix it was somewhat more difficult, but I managed it in the end. The cadence unit is at a bit of an angle making it a long stretch for the speed magnet. This has a screw adjuster that allows the arm to be swiveled into position.
The trick to installing the cadence sensor is to fit all the components loosely and then ensure that they all work before tightening the cable ties in the final position. Before trimming the excess tie I made sure that it was really tight by getting that last click using a pair of pliers.
Once you are happy with the position snip off the excess fastener and then you are ready to ride.
|
|
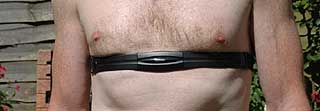
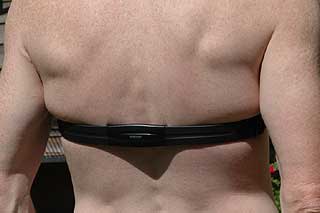
So the hardware is now all installed on the bike. This just leaves the heart rate monitor. This is of course fitted to your chest. Now we have the opportunity to present a gratuitous picture of a young female chest with the monitor in situ. Sorry guys that isn't going to happen... I couldn't even find a body double so you will have to put up with my chest...
There are a couple of ways to fit the HRM, mainly with the sensors on your chest or on your back. I have actually found that once your heart has been picked up the actual positioning is not too critical. In fact on occasion it has slipped down towards my waist and still picked up my heart rate.
I found that whilst riding I got used to having the strap around me and most of the time I didn't realise it was there. It is reasonably comfortable, and doesn't slip (on me anyway).
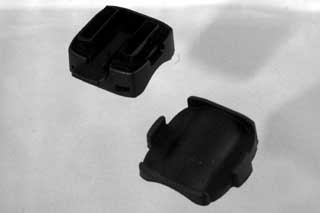
The only slight issue I found was with the buckle at the back (shown on the right). when I am wearing my CamelBack hydration backpack it presses the buckle into my back. This wasn't too much of a problem though.
|
|
Pairing the Edge 305 and sensors
Once you have installed the Garmin Edge 305 and the cadence sensor they need to be paired. As they communicate wirelessly with each other the Edge needs to connect to each sensor before it can receive input from it.
The initial pairing needs to be done away from other wireless systems this allows the Edge to pick up the sensors it is supposed to be monitoring. This is a little like black magic, but it seems to work quite easily.
The cadence sensor has a small press contact which puts the sensor into pairing mode. The HRM just seemed to connect by itself.
Subsequent pairing is much faster as the Edge 305 seems to remember which sensors it is paired with. If you have problems or need to change one of the sensors then you can use a setup feature to either turn the sensor off or to re-pair it.
|
 |
Setting up your Edge 305 software
With the system hardware all installed and connected together you are almost ready to get on your bike and start recording your trips. There are a few settings that need to be made on the Edge before it can provide accurate analysis of your training and trips.
Firstly you should check the Garmin website to see if there is a software update for the Edge 305. Since I got my review sample there have been 2 updates. IT is always best to install these before you start configuring the Edge to your requirements as the update will erase all your settings and reset the Edge to factory defaults. The first time I did this I also lost some of my training data as I foolishly did the upgrade without downloading all my tracks.
Next you need to provide some personal information such as age and weight. This is used to calculate your heart rate zones, and calorie consumption. You also need to provide some data about your bike such as weight, and wheel circumference. Actually the system can work out the wheel circumference automatically using GPS data when you start cycling.
The Edge can store data for up to 3 different bikes, this allows it to provide accurate figures for your training sessions. You do need to make sure that when you change bikes you also set the Edge 305 correctly.
There are some other settings that can be modified for the more advanced features of the system. I will cover these later when discussing the appropriate feature.
OK after all this setting up you are finally ready to go out for your first ride.
|
Preparation for Cycling
Obviously before you start your cycle ride you need to ensure that there is sufficient power in the battery for your trip. I have a routine whereby I fully recharge the Edge after each ride. This has two results: firstly it guarantees that the battery is topped up for my next trip; and secondly that my recorded data is transferred to my computer and is not lost.
Next the Edge needs to be mounted on your bike and switched on. When it is switched on it will start searching for satellites and this may take quite a time to achieve the initial fix, or if you have moved a few hundred miles since your last fix.
The final thing you need to do as you start off is to remember to hit the start button. This is something you will get used to, but the Edge does not record any data until you press start. Imagine your disappointment if you return home after a 2 hour trip and find you have not captured your session. I know what it feels like I have done it a couple of times.
But before we go off on our first ride though, lets check out the hardware and software features of the Edge:
|
 |
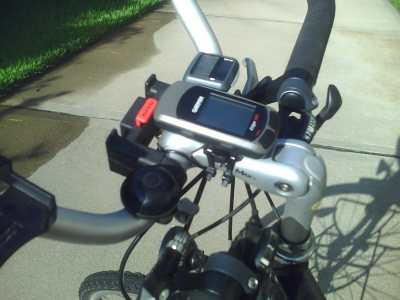
The Garmin Edge 305 hardware
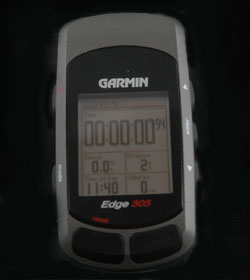
The Garmin Edge 305 is a compact GPS system. Measuring approx 3 inches by 2 inches and just under 3/4 inch thick it has the perfect balance between size and functionality. Its display at 1.3 x 0.8 inches is big enough to to be read, but the GPS receiver is still small enough to fit comfortably in your pocket.
Situated on the top of the Edge 305 are the Lap and Start/Stop buttons. As mentioned above the Start/Stop button need to be pressed to record your training and route data.
|
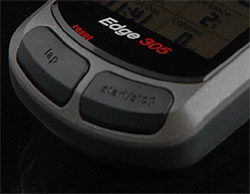 |
The lap button can be pressed to manually record a point where the next lap starts.
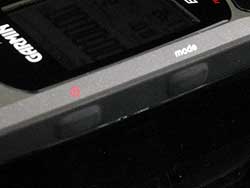
On the left side (I was so tempted to say edge there...) of the Edge 305 are the buttons to switch the unit on and to page through the various modes of the software.
As with most Garmin GPS systems the on/off button also doubles as the backlight illuminator. You simply press briefly for the back light or hold for a couple of seconds to switch the edge off.
The mode button sequentially moves through the different main display screens.
|
 |
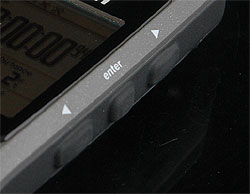
On the right side are the control buttons. These are up/down and the enter button. Getting used to operating the Edge can take a little while. I still have a tendency to hit the mode button rather than the enter button.
The up/down arrow buttons are context sensitive and will have different actions depending on the display you are using.
For instance on the Bike Computer display pressing either arrow toggles between the two displays. But on other displays it will move between fields.
|
 |
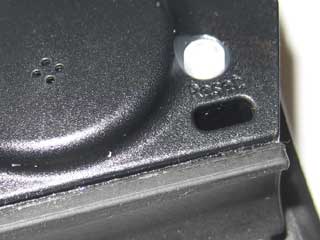
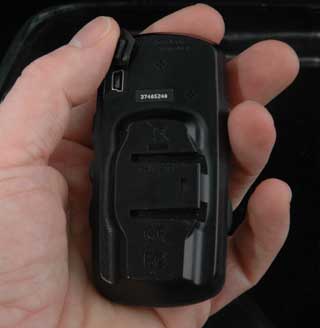
On the back if the Edge 305 hidden behind a rubber bung is the mini-USB socket allowing connection to a PC to exchange data and to programme the GPS. This is protected by a rubber bung which makes it waterproof to IP7 standards
Also on the back you can see the two grooves that fit into the mounting to secure the Edge to the bike. As you can see these grooves are only on one side of the device so you must be careful with the mount's orientation when initially installing it.
You can't actually see it on the image to the left, but between the two grooves there is an indentation which firmly anchors the Garmin Edge in place when mounted on the bike.
All of the review team who have installed the Garmin Edge 305 have been impressed with the simplicity, ease of installation, flexibility and security of the mount. Garmin have obviously spent a lot of time researching this part of the system. |
 |
The Garmin Edge 305 software
The Garmin Edge sports some pretty familiar software. The unit has a very similar user interface both in terms of physical operation and software to most other garmin devices. This makes it easy to use for those of us with Garmins, and a little tricky for people not used to Garmins.
It doesn't take long to learn though and the biggest mistake most people (meaning me) make is to press the mode button rather than the enter button.
|
  |
The two images to the right show the different states of the status bar. There are 5 icons: Power, Satellite Status, Interface, Cadence and Heart Rate Monitor. You can see in the left image that the cadence and HRM are not connected but they are in the right picture.
|
  |
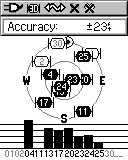
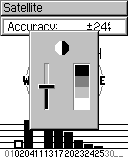
After the "splash screen" you will be presented with the Satellite display. Initially this will present the image to the left while the Edge is searching for satellites.
When a fix has been obtained you will see something like the picture on the right. The black bars and corresponding black satellite icons are the ones being used in the fix.
At the top of the screen is a calculated accuracy figure. This is used in the map mode to show a circle of accuracy.
|
  |
Once you have left the satellite display it can be reviewed by using the Menu options Navigation-> Satellite.
If you press the up or down arrow on this display it will adjust the brightness of the backlight. To illuminate the back light simply press the power button.
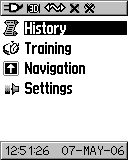
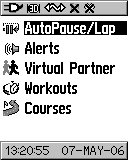
The image to the far left is the main menu which is reached by pressing the mode button a number of times.
|
  |
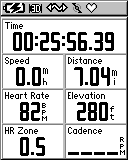
Bike Computer
Of course the Garmin Edge has a bike computer display, in fact it has 2. These are accessed using the up and down buttons.
Each of these displays are highly configurable with an amazing amount of data. I generally have one set up with my current data, and the other with average data. Where there is no data the digits are replaced with underscores.
Since taking these images I have changed the first display to have a large speed field.
|
  |
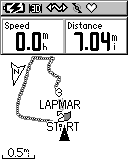
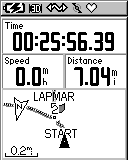
Map Screen
There is a map screen which displays a breadcrumb trail. This doesn't show an actual map, just an indication of where you have been. The map screen can be scaled in and out.
You can also display some data fields on the map screen, these as with the bike computer, can be configured to your precise requirements.
By default the map screen is not displayed when you page through the screens using the mode button. This can be configured in the settings menu.
|
  |
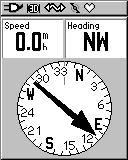
Other Screens
There are two other screens worth mentioning, the compass display and the elevation screen.
The elevation screen graphically displays the altitude profile of your session.
Both screens have additional data fields appropriate to the display. These, unlike the other screens, are not configurable in the settings menu. |
  |
Configuration
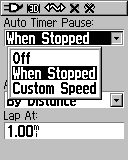
There are far too many configuration settings to describe here, but the most important ones for me are auto timer/lap and alerts.
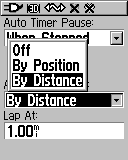
The timer can be paused when stopped or below a certain speed. This allows you to record not only elapsed time but also moving time.
You can also set up auto lap recording. I have it set to start a new lap for each mile. You can also do it by position. When you select by position you then have 2 further options Start and lap or Mark and lap. Each time you pass that location a new lap is recorded. |
  |
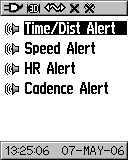
The other configuration setting of interest is the Alerts. You can set the Garmin Edge to beep at you when you pass certain pre-set event values. I find that I try to workout in heart rate zone 3 and 4 therefore I have the Edge set to warn me when I hit HR zone 5.
I originally had it set to warn me when I came out of HR zone 3, but found that my recovery rate was too quick and beeped annoyingly almost as soon as I stopped. |
  |
Navigation Functions
Yes this is a Garmin GPS and all Garmins have navigation capabilities. The Edge 305 is no exception.
You can create waypoints, locate waypoints and then goto a point. This will then show a line on the map screen giving you a bearing to follow to your destination.
Obviously a straight line to your destination is not always practical so you can create a route and follow that instead. |
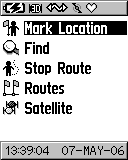 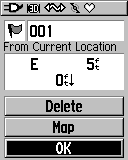 |
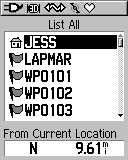
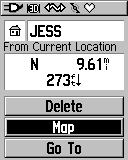
When you select "Find" you have the opportunity to list all, or nearest marks. This will then show a list enabling you to select the point you want.
When you select the required waypoint you are shown the details of the waypoint and given some options including showing it on the map or navigating to it.
You can also delete a single waypoint. This can be a problem if you have a large number of waypoints you need to remove.
|
  |
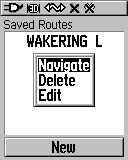
You can also create and navigate route on the Edge. A route is essentially a number of linked waypoints. When you select the route press the enter button and then select navigate. This then indicates the direction you need to turn as you approach a turning.
I find it easiest to create my routes using a PC application such as Memory-Map and then use the MM interface to transfer the waypoints and route to the Edge.
There is a limitation of 100 waypoints which can severely restrict the points available to be stored in routes.
|
 |
Training
The whole concept of the Garmin Edge 305 is to use GPS to enhance your performance in training.
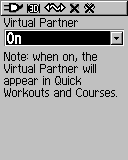
We have already dealt with the AutoPause / laps and alerts above. The Virtual Partner when enabled acts as a pacemaker.
The Virtual Partner shows how far ahead or behind you are compared to the profile. this can be either the workout schedule or a pre-recorded course.
|
  |
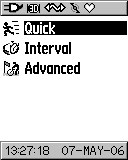
Workouts
There are 3 different types of workout available on the Garmin Edge. These are mainly suitable for terrain where it is flat or controlled like a race track. If a few hills or rough terrain is part of the ride it makes it difficult to maintain consistency. In these cases you should use courses.
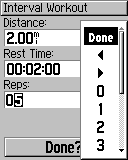
The interval workout is highlighted here. Basically you can select one of four different types of workout with varying distances and times. |
 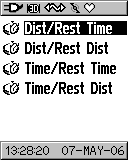 |
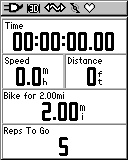
Once you have selected the workout type you can further refine it to your requirements by specifying distance and time parameters and the number of repetitions to be completed
Later versions of the software also include a tick box for warm up and cool down to be added to the workout. Select done and you are presented with the Workout screen and off you go...
|
  |
Courses
Courses are a more realistic training methodology for road conditions where sudden stops and undulating terrain comes into play. I like courses as you can ride a particular route record the track and then use that as the basis for your training. The course can be based on a workout that has been recorded.
Effectively all you need to do is create a new course, then find the recorded session that you want to replicate. |
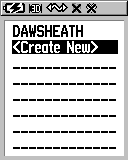  |
All you need to do now is name it and then select it and "Do Course". The image on the right shows the bike computer about to start the course. I have selected to ride with the virtual partner to let me see how I am doing compared to the baseline course.
Obviously over time you would expect to improve so that you will streak ahead of your pacemaker. At some point it is a good idea to reset the baseline to your current standard of riding.
|
  |
Analysis
The Garmin Edge stores a wealth of data. This is all available on the Edge itself, or can be downloaded onto a PC for analysis with other tools.
The on-board analyse of the Edge is a little limited due to the screen size and capabilities, but it does provide all the important data for your cycling sessions.
When you select history you can then select the data you want to review. |
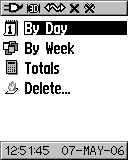 |
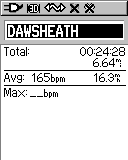
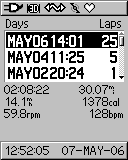
I selected to view by day and this then listed the days where I had actively trained for further selection. The image to the right shows the summary of the days cycling.
As you can see I did 30.07 miles at an average of 14.1MPH. More interesting for me is the cadence and heart rate averages. As you can see this wasn't a strenuous ride for me as my maximum heart rate was only 169. I often peak over 185. |
 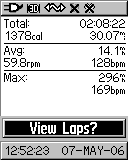 |
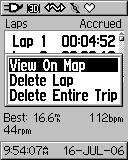
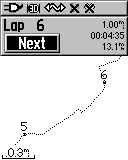
Finally you can actually view the details of the individual laps. these can be selected and shown as a map.
This gives you quite a range of analysis options, but far better is to upload the data to a PC and use some of the many analysis tools available there. I have briefly covered some of them below. Sometime soon we will be creating a review of these PC applications and their usage with the sports and fitness GPS systems. |
  |
The Garmin Edge 305 in use
There are many ways that you can use the Garmin Edge 305. I have 2 main modes that I use depending on what I am trying to achieve training and recreational cycling.
One of these is my training loops. These are circuits that I can ride on a regular basis and can compare my performance over time. I have a 2 lap loop near where I live that gives me a chance to warm up a bit. Then I have 2 3 mile loops followed by a short cool down.
I start the Edge when I leave my house so that it has a fix by the time I have completed the 450 metre warm up, hit the start button and then pedal like mad. As I pass the start point for my second lap I hit the lap button. Then finally as I finish the second lap I hit the lap button again leaving the edge recording so I can watch my heart recovery rate.
This is fun using the virtual partner. Once the circuit has been completed once the tracklog can be used as the basis for a training session and you can race the virtual partner.
My other main activity is recreational cycling where I decide where I would like to cycle, programme a route into the Edge and then "navigate" round it. This really is a wonderful way to use the Edge. It gives you directions for travel as well as recording all the data.
I tend to use Memory-Map to enter my routes, as this allows me to see on a map exactly where I want to position my turns. The software then allows me to transfer all my waypoints and routes to the Edge.
|
|
One thing I did find a bit of a problem was having to hit the start/stop button before the recording starts. This may be second nature to athletes who are used to stop watches, but to a recreational cyclist moving into training this is a discipline to be learnt. The other problem I encountered was determining which is the lap button and which is the start/stop one. They are not clearly marked and when hurtling down the road at 27MPH the last thing you want to have to do is spend precious seconds trying to read the indentations before hitting the wrong button anyway...
The screen is just about the ideal size for me. I can glance down and see my speed instantly, if I need to see what my other readings show me it takes slightly longer. The reading position is also good (especially as my near sight is failing me with age) being just short of arms length I can read the figures with relative ease. The buttons are well positioned and operate easily.
Most of my rides are between 2 and 3 hours so battery life is not an issue for me. However, I am sometimes in the saddle for most of the day. On these days I need the Edge to run for about 7 to 8 hours. I have done this twice and still had power left in the device. One of these days I will cycle until one of us runs out of power. Hopefully it will be the Edge first...
|
User Reviews
We often feature user reviews on PocketGPSworld.com, but with the target market of the Garmin Edge being so diverse we thought it would be useful to find out the opinions of some typical cycling user groups. Apart from myself (recreational cyclist) we have provided review units to a tri-athlete, a keen road bike club member, a cycle commuter and a long distance trail rider. This is what these users thought about the Garmin Edge. Their full reviews will be published shortly.
|
Simon Maskell: Tri-athlete
The Garmin Edge 305 is geared towards the bike rider but I found that when I experimented with my running training the computer worked well and measuring my distance covered and running speed via the GPS.
This is a product I would definitely think of purchasing, however I am sure it is an expensive alternative to my current speedometer and heart rate monitor.
|
Peter Barrett: Road Bike Clubber
For the rider only interested in basic ride statistics such as distance, time and speed the Edge 305 will be very underutilised and consequently very over priced. However, for the rider seriously interested in performance, it is the ability to create varied workouts and courses and then race against the virtual partner that makes the Edge such a valuable training aid.
From personal experience and reading the Motion Based forum it would seem that these are early days for the Edge and that the firmware will be subject to much update to resolve problems or incorporate new features. Fortunately Garmin have provided a very user friendly means of downloading firmware updates.
|
| Chris Nowak: Cycle Commuter Build quality 10/10 – I even dropped it on concrete and it still worked!
Ease of installation 6/10
Ease of use 8/10 – found it quite intuitive really since I use an Etrex
Street cred 8/10 – looks the bee’s knees on the bike
Who should buy it? Cyclists with a passion for trekking long distances away from home and those who want to get fit quick! Oh err and hi-tecchy geeks like me who would try out geochaching by bike. This might coin a new term for the sport – GEOBIKING perhaps? (remember you saw this first on PocketGPSWorld.com)
Undeniably good kit but could do with some improvement to the method of attaching the pedal magnet and wireless cadence sensor unit to the bike to make it almost perfect.
|
Lutz Bendlin: Long Distance rider/hiker
 I got the Edge 305 after Mike had done his tests, and immediately put it up to work during our recent trip to Scotland. We didn't have our bikes with us, so I tested the Egde slightly "off purpose" - as a hiking instrument. I got the Edge 305 after Mike had done his tests, and immediately put it up to work during our recent trip to Scotland. We didn't have our bikes with us, so I tested the Egde slightly "off purpose" - as a hiking instrument.
Granted, it doesn't have any maps, but then our hikes are not that strenuous either (not any more, that is). Our main task is to find a hill to climb (a small one will do) and to find the way back to the car. After the hike we want to be able to brag about it, of course.
So the Edge needs to record where we have been, and accept waypoints for important stopping places and for the location of the car.
The image to the right shows the track for a beautiful, beautiful hike at the edge (haha) of Lake Kinlochlevern just south of Fort William. Highly recommended area!
After using the device for a number of hikes I can say that technically it is fit for the off-purpose use, minus three items:
- the battery runtime is a bit on the tight side. Six hours is barely enough for a longer walk, and not suitable for multi-day hikes. You will have to take some kind of charger with you (I plan to use a solar charger with buffer battery and USB connector)
- as Mike mentioned already, the most annoying thing is that you have to remember to press the "Start" button to actually start recording your track. It would be so much easier if the damn thing would just record continuously, whenever it is on. I lost a couple of track recordings. Well, to be precise, I never started recording until it was too late...
- surprisingly the device has no display for the latitude/longitude of your position. I understand it is targeted towards bike riders, but don't they want to know this piece of information?
On the positive side the device is small, sufficiently watertight, and pretty easy to operate, even without studying the manual.

I have since mounted the Edge onto my touring bicycle, but have to wait for cooler weather to actually put it to the test. The mounting itself was very easy, and I like the slick way the mount can be angled (using the rubber insert). For me it made the difference between unusable and highly functional (without the insert the Edge would have been stuck in the mount due to the handlebar design on my bike).
One thing is for sure - my old solar powered bike computer (of the Aldi variety) can go find a different host. If only the Edge had a solar cell included... |
Analysis software
Garmin Training Centre
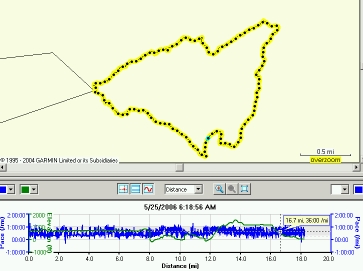
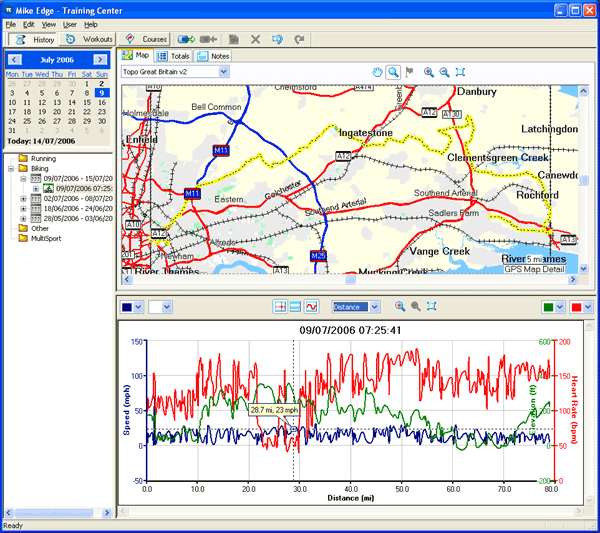
The Garmin Edge comes with the Garmin Training Centre software. This allows you to download the recorded data from the Edge (and other Garmin devices) and perform some post ride analysis. Basically it gives the same information as the on device displays, but as it is on the PC there is a much greater capability for better presentation.
The whole trip is mapped out using the Garmin mapping products that you have installed on your PC. In my case I have City maps and Topo so I have very good detailed analysis. Normally you just get basemap with major roads.
Underneath the map there are some user selectable data graphs. These let you examine Heart Rate, Cadence, Speed, Elevation at the sam time as pinpointing your position on the map.
|
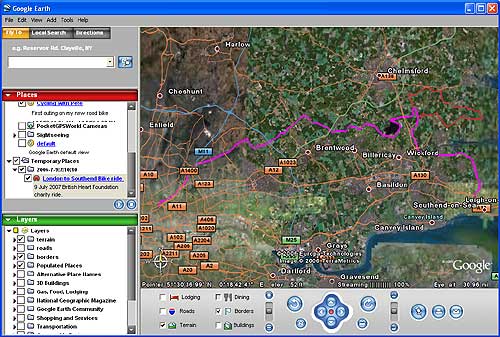
Motion Based
www.MotionBased.com is a website that specialises in the analysis of training data primarily from Garmin GPS units and has agents to collect the individual data records from each type of device. In the case of the Garmin Edge 305 this uploads the location, speed, elevation, heart rate and cadence. This information is presented graphically in the same manner as the Garmin Training Centre, but the difference here is that this is all stored online.
As this is held in a central database on the Internet it is possible to share your routes and trips with friends so they can see where you have been. You can also share your rides with others so that they can enjoy the same places that you have. This is great for mountain bikers who may want to visit say Moab the Mountain Biking capital of Utah if not the whole USA... Someone who found a wonderful trail can publish it on Motionbased and others can follow in their tyre (or tire) tracks.
A great feature of Motionbased is that it can export your data into a number of different formats, including my favorite of the moment: Google Earth. The image below uses the same data as that from the Garmin Training Center above.
|
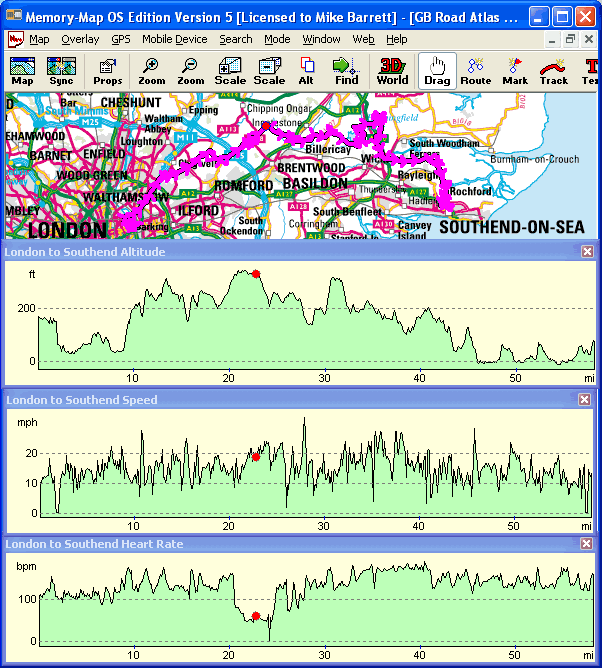
Memory-Map
The tools mentioned already are very specific to training and analysis. There is another tool that some GPS or outdoor enthusiasts may have already: Memory-Map.
One of the free updates to Memory-Map V5 introduced support for the Garmin Edge systems this allows the application to import the heart rate information from the device. It is displayed as a profile graph in the same manner as the speed and elevation data. Currently the cadence data values are not supported, but I am sure that will change in the near future.
|