| Overview
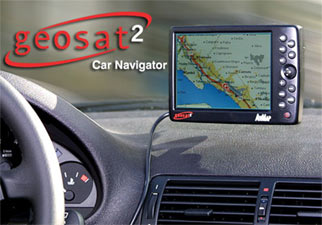
The AvMap GeoSat2 is a complete navigation package in a box. It comes complete with maps of your region and is ready to plug in and go. It also gives you turn by turn voice instructions.
Mapping is available of both Europe and the United States of America.
With the introduction this year of GPS Navigation Systems on mobile phones with screens measuring barely 1.5 inches it comes as quite a change for us oldies with failing sight to have a massive 5.6 inch screen. One of the main applications for this is the RV or as we call them over here motor caravans. Either way what it does mean is that you can easily see the screen no matter how far you are away from it.
|
 |
| What's in the box
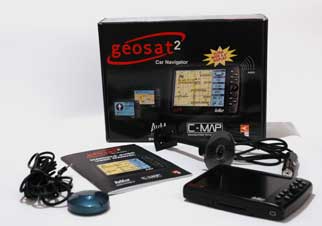
The review sample that I was provided with contained: the navigation unit, the GPS antenna, a power supply, a windscreen mounting solution, CD with Teleatlas maps of Europe, a USB cable and an instruction booklet.
The GPS Antenna comes with 3 metres of cable so can be mounted just about anywhere you need to get a clear view of the sky.
The review sample came with maps of the UK pre-installed on a proprietary CF card. You also get two CDs containing the full maps of Europe. These can then be installed over the currently installed maps.
|
 |
|
Manufacturers Specifications
- GENERAL DETAILS:
- Power supplied by car lighter
- Destination Search by virtual keyboard
- Quick search for the latest destinations
- High detailed street map database
- Trip Computer
- The unit is loaded with the digital chart of the country of purchase
- Points of Interest
- Recording and storage of Marks
- Ultra compact design
- Removable installation bracket
- DESCRIPTION:
- Colour screen TFT 5,6"
- Voice guidance
- Easy to move navigator
- Easy to carry
- Best route planning
- Automatic route recalculation
- Arm9 200 Mhz Extremely fast processor
- Backlit keyboard
- Usb port for PC connection
- Speaker included
- 12 channel GPS receiver, continuously tracking and using up to 12 satellites
- Digital charts on 256 MB Memory Compact Flash
 MAP COVERAGE MAP COVERAGE
- Italy
- Germany
- Portugal
- France
- Spain
- Belgium
- Austria
- Switzerland
- Sweden
- Norway
- Netherlands
- Denmark
- Luxembourg
- The United Kingdom
- Greece (Athens)
- Finland
- Ireland
- Poland
- Czech Rep.
|
| Hardware The hardware is basically three components: The system unit, the GPS antenna and the power cord.
The system unit is 6 inches wide, 4.25 inches high and 1 inch deep. It is powered by an Arm9 200Mhz processor and has a 320 x 240 5.6 inch TFT screen. AvMap claim that the display is readable in the sunlight, and I must say that I never experienced any issues during my testing.
The GPS antenna and power cord both connect to the bottom left hand side of the system unit. There are no markings on the GPS to indicate who manufactures it, and there are no specifications other than it is a 12-Channel GPS receiver.
|
 |
I never experienced any problems getting a satellite fix during my testing. As mentioned above one of the target markets for this navigation is the RV or Camper users. The provision of a GPS with a 3 metre long cable seemed a bit of an overkill for my car, but when trying to install the GPS in a camper the extra cable is useful trying to overcome the problems of the overhanging cab blocking reception.
The power supply fits in a standard cigarette lighter socket. It is also a multi voltage device allowing operation at either 12v or 24v. This can be useful if you are installing it in a truck or lorry with a higher voltage system.
The navigation system itself does not include any form of self power. When the vehicle is switched off the system does not work. This effectively prevents you experimenting with the settings and controls when you are not in the car. I got around this by buying a 240v to 12v cigarette lighter adapter, so now I can use it in the comfort of my lounge, much to the annoyance of my wife.
|
| The Installation
Installation of the system was child's play.
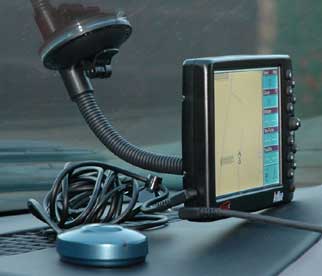
The mounting system is that manufactured by Herbert Richter in Germany, and forms the foundation of many of the current mounting systems for GPS and other in-car devices.
The windscreen mount is a seven inch goose-neck suction mount which terminates in the famous HR mounting plate. This mounting plate has 4 lugs on it that locate directly into the rear of the GeoSat2.
I find it useful to try and position the system so that part of the device is resting on the dashboard, which reduces the vibration transmitted down the goose-neck.
As you can see from the picture to the right the GPS and power plug into the lower left of the GeoSat2. As I have no problems with satellite reception I just leave the GPS antenna tucked behind the display.
|
 |
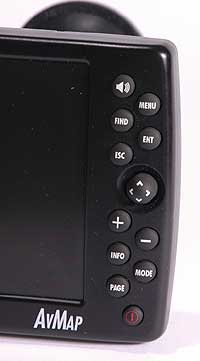
Controls
The system is controlled by a set of buttons and a joystick located on the right hand side of the receiver. For people who are used to the touch screen of a PDA the interface will seem to be a little awkward at first, but you will get used to it.
The worst thing about trying to learn to use it is that it needs to be plugged in and powered from a cigarette lighter socket, which means you sitting in the car. I prefer to learn a new device in the comfort of my office or home.
OK whine over, the control interface (that sounds technical doesn't it?) is actually quite easy. Just twiddle a few knobs, press a few buttons and off you go. Well not quite...
Starting with the joystick. When you are not navigating through menus this is used to move a pointer around the screen, in menus it is used to select the options etc. Moving it to the edge of the screen will scroll the map.
The menu key is where the Menu system is initiated. The joystick will now move the selection highlight. The two buttons Ent (enter) and Esc (escape) will either action or abandon the selection.
|
 |
When you need to enter text a virtual keyboard is displayed, which will allow you to select characters and commands with the joystick and the Ent button. When navigating in the dialogue prompts the joystick will move from field to field, with text entry fields it will highlight the title pressing the Ent button will allow you to edit the text in the field.
Entering characters using the virtual keyboard can be a little frustrating at times. In particular the software tries to be helpful and predict the name you are trying to type. If you hesitate whilst looking for the location of the next character then the cursor jumps to the "enter" command. It caused me quite a few problems when trying to enter some names.
A feature of the latest software is to select only the keys that are available for any matching words. What this means is that it is far faster to locate the correct entry. For instance if you have entered "SC" and the only matches are "School Lane" and "Scion Close" only 'h' and 'i' would be available on the keyboard.
|
| The software OK so that is the technical stuff out of the way. On to the description of the AvMap GeoSat2 system in operation.
As highlighted above the AvMap GeoSat2 is a complete navigation solution with voice guidance. If you ignore the instructions or have to detour then the system will recalculate your route and get you back on your way.
There are two modes, driver and passenger. You will be prompted when you turn the system on which you want to select as shown to the right. In Passenger mode you can see exactly where you are on a map, and can display additional data. In driver mode you are shown turn instructions only. |
 |
The image to the right shows the main map screen of the GeoSat2. This has an information bar on the right. When you have a satellite fix and are traveling along a route this will populate these boxes with appropriate data. If you press the mode button this panel will be removed and you will have a full screen map.
If you are following a route you can press mode again and have this panel replaced by one at the top of the screen showing you the next turn instruction.
As you drive the route the map rotates to your direction of travel and automatically scales to give more detail of required manoeuvres. The voice instructions are loud and clear. |
 |
The GPS Status Screen
The GPS status screen is displayed when the GeoSat2 is started, and remains displayed until a satellite fix has been acquired. This can also be displayed by pressing the menu button twice to get the system menu and then selecting the "GPS PAGE..." option.
The main part of this screen shows the position of the satellites on the right and their identifying numbers and strengths in the bar graph on the left. (Of course a signal is required to display it.) If a satellite is being used a green bar will be displayed, if the system is trying to get a fix with that satellite it will be red.
The screen also displays your position, the strength of the fix and your current course (when moving) and speed.
|
|
Locating Places
One of the areas that lets navigation systems down is the ability to find places. Well the GeoSat2 comes with 3 different ways to find things: Nearest to Cursor, By Name, and By Co-ordinates.
The Nearest to cursor is a great way to find things. Normally the cursor is at the GPS position so this will double the functionality.
Finding the Nearest City lists all the places around the location by distance, It shows both the Postal Name and the Administrative (Council) District name. This is a real plus that is missed by a lot of GPS applications. In Europe the Postal and Administrative names are the same. Over here it can cause great problems and confusion, not so with GeoSat2.
|
 |
Locating a POI is also just as easy. This time you are presented with a secondary screen allowing you to select the POI category group. Once again this will show you the nearest POIs radiating out from the selected location.
If you select a POI and press enter more details are displayed, which can in some cases include a phone number.
Pressing the Menu button here will display an options menu, from which you can display the location on the map, or set the start or destination for a route.
The system also supports "Marks". These are user defined locations such as favourite locations, home etc.
|
 |
Finding an Address
One of the problems with a lot of GPS navigation software is the ability to find places. The GeoSat2 is quite easy to use when finding addresses, but does not support postal codes. For use on the continent that is probably not too bad as a post code only identifies a town, in the UK a post code pin-points a house. So is a crucial piece of missing functionality.
Having said that the GeoSat2 software is aware of the difference between council area names and postal towns. It is easy to locate addresses using City/Road/Number combinations.
However it did cause me some problems when trying to find my brother's address in Wales. His postal address is in Cwmgwrach, but most systems list him as Blaengwrach. Selecting his town then his road actually tried to send me to Briton Ferry. Taking the option to "Select on Map" did actually give a selection of Blaengwrach or Briton Ferry. For this particular address it was a bit confusing. This seemed to be the exception rather than the rule though.
|
 |
Navigating : Setting the destination
Having entered the address you are looking for you now need set it as the destination. This is done by using the menu button and selecting the "SET AS DESTINATION AND CALCULATE" option. This will create a route from you current GPS location. On the later version of software there are travel Vias. These can be entered by selecting a new "Advanced" option in the Route Planning section.
You can also set the selected location either as a departure or a destination for route planning. When you do this remember to switch off the automatic re-routing as your planed route will be instantly overwritten. I actually found the route planning to be a bit cumbersome and not particularly useful as I couldn't find a way to access the route instructions and the satellite fix kept jumping back to the current location. It just seemed that I would have to change too many configuration settings to get route planning to work for me.
That said I planned a number of routes from my current position to locations that I use quite a lot and know the "best" route to get there. The routing engine seemed to make logical decisions and in the main created routes that I would have chosen.
You have some control over the routing decisions for shorter distance or faster time. Also for avoiding "Toll Roads", "U Turns", "Ferry Routes", and "Walkways"? How many of us drive down pathways? There are no options to customise the routing to your driving style of preferences beyond these settings.
A further option available is the blocking of roads. You select the road you want to block with the cursor and you can also unblock single roads or all blocked roads.
|
|
Navigating : Driver Mode
As mentioned earlier there are two operational modes to the GeoSat2: Driver and Passenger. In the driver mode the map is hidden whenever you are moving. The reasoning behind this is to prevent distractions, and to present you with clear and concise instructions for your journey.
This is achieved using 2 different screens: a next turn screen, and a route card screen.
The next turn screen presents you with a large graphic indicating what you need to do at the next junction. It also tells you how far away the turn is both in terms of time and distance. It also tells you how far is left of the journey. |
 |
Pressing the "MODE" button toggles between the turn instruction and the route card screens.
In the route card screen the next instruction is highlighted at the top of the screen, followed by the next 2 turn instructions, at the bottom of this screen is the destination details.
The route card does not automatically select and position the next instruction at the top when the turn has been completed, and the information presented (distance in statute miles) remains that from the start of the route, not something more meaningful like the distance to go.
Pressing the "MODE" button again will redisplay the next turn instruction screen.
|
 |
Navigating : Passenger Mode
The Passenger Mode is far more interesting. Not only do you get a big map, but you also get to see some additional data about your position.
When running in passenger mode there ar 3 possible screens that can be displayed: A full screen map; The map with a display panel on the right; and The map with the next turn instruction at the top (not shown).
In all cases the route is highlighted you can select if the highlight is in front or behind the map graphics. Your current location is shown by either a car icon or a circle. I prefer the car. As you turn your current position is maintained on the display and the map is moved as you travel. There is an option that will auto zoom the map as you approach a turn instruction. This is extremely useful to glance at and make a better choice when comparing the audible instruction to the map, and the physical road.
The panel on the right displays some metrics about your journey. If you do not have a route set then some of the boxes will not contain data, but the rest will report the current GPS information.
If you are driving a UK vehicle you will find that your car speedometer will report a higher speed than the GPS speed. This is a "feature" of the UK spec cars. The GPS is the accurate figure, though try explaining that in court officer!
|

|
Other Features
There are lots of other features and options. The configuration settings are described on another page (click here for this page). There is also a trip computer that provides some metrics about your journeys.
|
Route Simulation
One nice feature of the software is route simulation. This allows you to plan a route and then watch as the system drives you through the route.
This works in exactly the same way as normal GPS mode so you need to set the system into passenger mode before you start. If you don't you will get the confusing message shown on the right. I suppose this is a problem in translation from Italian. |
 |
| Mapping Data
The map data is provided by Teleatlas in a proprietary C-Map format. The maps I reviewed seem to be the 16th April 2004 release. These did not appear to have the new M6 Toll road on them, and there is some coverage of Southern Ireland, though it is not full coverage. It appears to be major towns/cities and main roads. My original system was provided with a 256Mb card with just the UK on it, the latest products come with a 1Gb card with the whole of Europe on it.
On the plus side the maps did come with Greece. This is the first time I have seen full country maps of Greece in any navigation product. Not being familiar with Greece I was not able to do any spot checks to see how good the maps are.
I assume that as AvMap provide a version of the GeoSat2 for the US market that you will be able to purchase the Maps of the USA on CD as well.
Points Of Interest
The map data comes with millions of points of interest. These are split up into POI categories and POI groups. For instance a petrol station will be in the Gas Station group under the Transport category.
With the POIs you can request additional information and get the details of the particular POI including address and phone number where available. There are no facilities to add your own groups of POIs.
One group of POIs that was being prepared whilst I was preparing this review is the Camp sites of the UK. This set of POIs would be very welcome with the motor-caravan community.
Installing Maps
To install any of the additional maps from the CD you first need to install the USB driver and map application. On the bottom of the unit is a mini USB connector. This allows you to connect the unit to a computer to either update the software, or to install new maps.
The software provided with the system has USB drivers specific to the GeoSat2, which allows you to access the device from your computer and install new maps. This application is called GeoSend and looks suspiciously like the management application of C-Map marine charts. It is easy to use all you need to do is select the area of your choice and then click on a button to transfer it to the GeoSat2. You don't need to worry about having a power source for these operations as the power is provided from the USB connector. This means that you don't have to have a laptop to reprogram the system. This will allow you to perform map and software upgrades as required. As the later version of software is released on a 1Gb card with the full maps of Europe you should not need to use this facility.
As I mentioned earlier the maps are stored on a CF card. This can be removed and inserted into a card reader on your PC. Although you can read the data it is in a proprietary format and is not interchangeable with other applications.
|
Issues and Problems
Whilst I was testing I didn't really experience any problems, certainly not on the road. The software did crash once whilst I was using Route Simulation, but after restarting remembered my planned trip and was able to perform the simulation properly when I retried. |


